Selecting and Refining Supply/Demand Zones
Refining is the skill that separates the average trader from someone who can break the game. It's how you turn a vague "this looks like a reversal area" into a 1-2% stop loss with 20R+ on the table. This lesson walks through the full workflow — selecting the right zone in the first place, then refining it down through HTF → MTF → LTF — and the judgment calls you'll have to make along the way.
We'll cover when to use 🎁Supply & Demand principles vs. when to look for hidden liquidity, the fresh wick concept, no-body zones, how far to refine before you front-run yourself, and a series of worked examples.
When to Reach for Supply & Demand
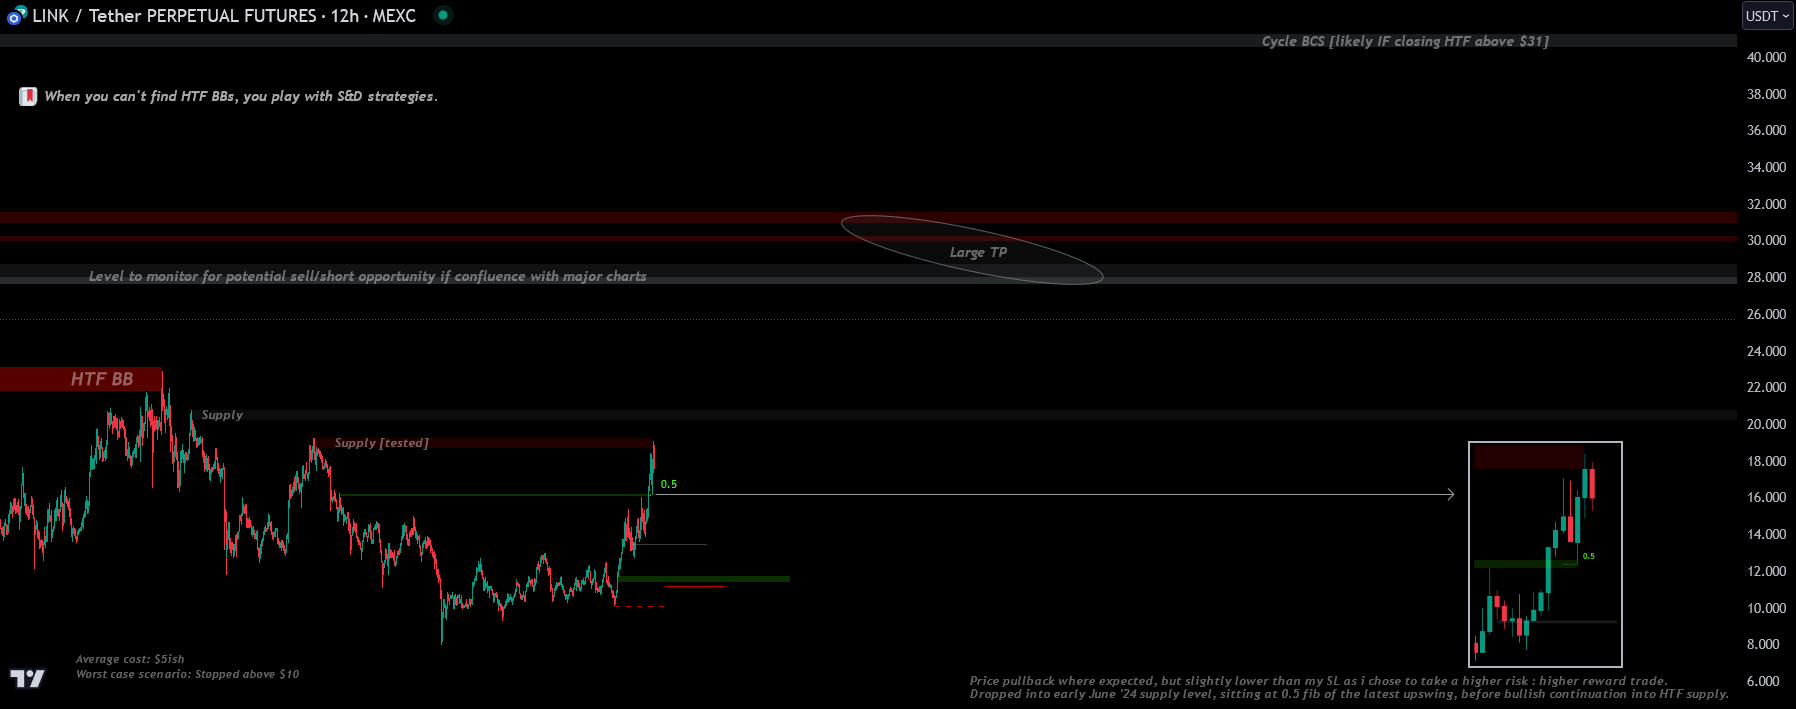
Before refining anything, you need to know what you're refining. Use 🎁Supply & Demand principles only if you cannot find HTF BBs or Hidden Order Blocks. Hidden liquidity is the priority — supply/demand is the fallback.
Within a range, select bodies in both extremes. If there are no refinable bodies near the extremes, fall back to fresh wicks, double tops/bottoms, or extreme discount/premium areas.


When you first look at S/D zones on the chart, it's natural to wonder how the width of the zone was decided, why some are red and others grey, and a dozen other questions. There is a system. The two governing rules:
- Use S/D principles only if no HTF BBs / Hidden Order Blocks are present.
- Always refine S/D zones to get a tight SL%. Refine using Fresh Wicks (FWs), lower TF bodies, fibs, the 0.5 of OBs / FVGs, or just wicks (for a no-body zone).
A note on caveat: these are decoded findings, not gospel. They get you very close to the right zone most of the time. Verify with TradingView overlays and your own work.
The Fresh Wick Concept
A fresh wick (FW) is the part of a wick in a supply (or demand) zone that is still untapped — still "fresh." The label exists because the word supply is too broad on its own.
Key rules for the FW:
- We only use it in the absence of HTF BBs / Hidden Order Blocks.
- A supply zone can be refined into the fresh wick if the supply is large.
- The fresh wick can itself be refined into lower-TF fresh wicks, OBs, or just wicks (for a no-body supply).
- HTF FWs very close to each other can be joined together, the same way you join OBs or BBs/HOBs.
When do you choose a refined wick instead of a clean supply block? A block is stronger than a wick if it qualifies. But in most real cases, the naked OBs aren't sitting at the extreme premium/discount, or taking them in with a double top would give you a too-wide level. So we use FWs when no BBs are available, the FW is at extreme premium or discount, and no clean bodies exist at both extremes.
No-Body Supply & Demand Zones
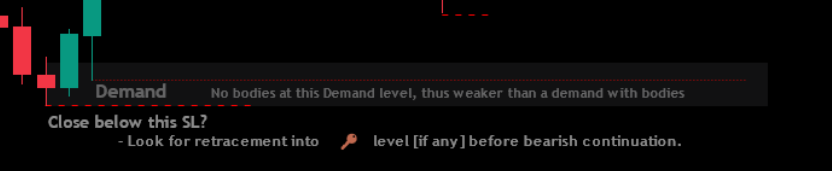
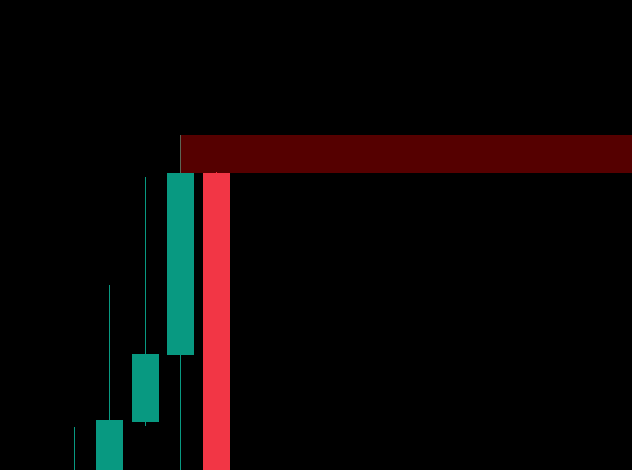
Sometimes the FW is too small and the supply OBs/bodies are too large, and when you drop to lower TFs you only see wicks — no clean bodies, no clean FWs. In that case, select all the wicks that sit above the bodies. That's your no-body supply zone.
Be Flexible When Refining
Refining is not linear. There are a million combinations of confluence that change how you refine.
- You might have a strong fib right above your supply zone — include it within your SL (pulling the level wider).
- You might have a wide level — tighten the entry to the spot with the most confluence (pulling the level tighter).
There is no step-by-step recipe. Each chart has different confluences. What follows are general guidelines, not a checklist.
Decoded Examples — S/D Zone Selection
Link Supply Zone — First Post
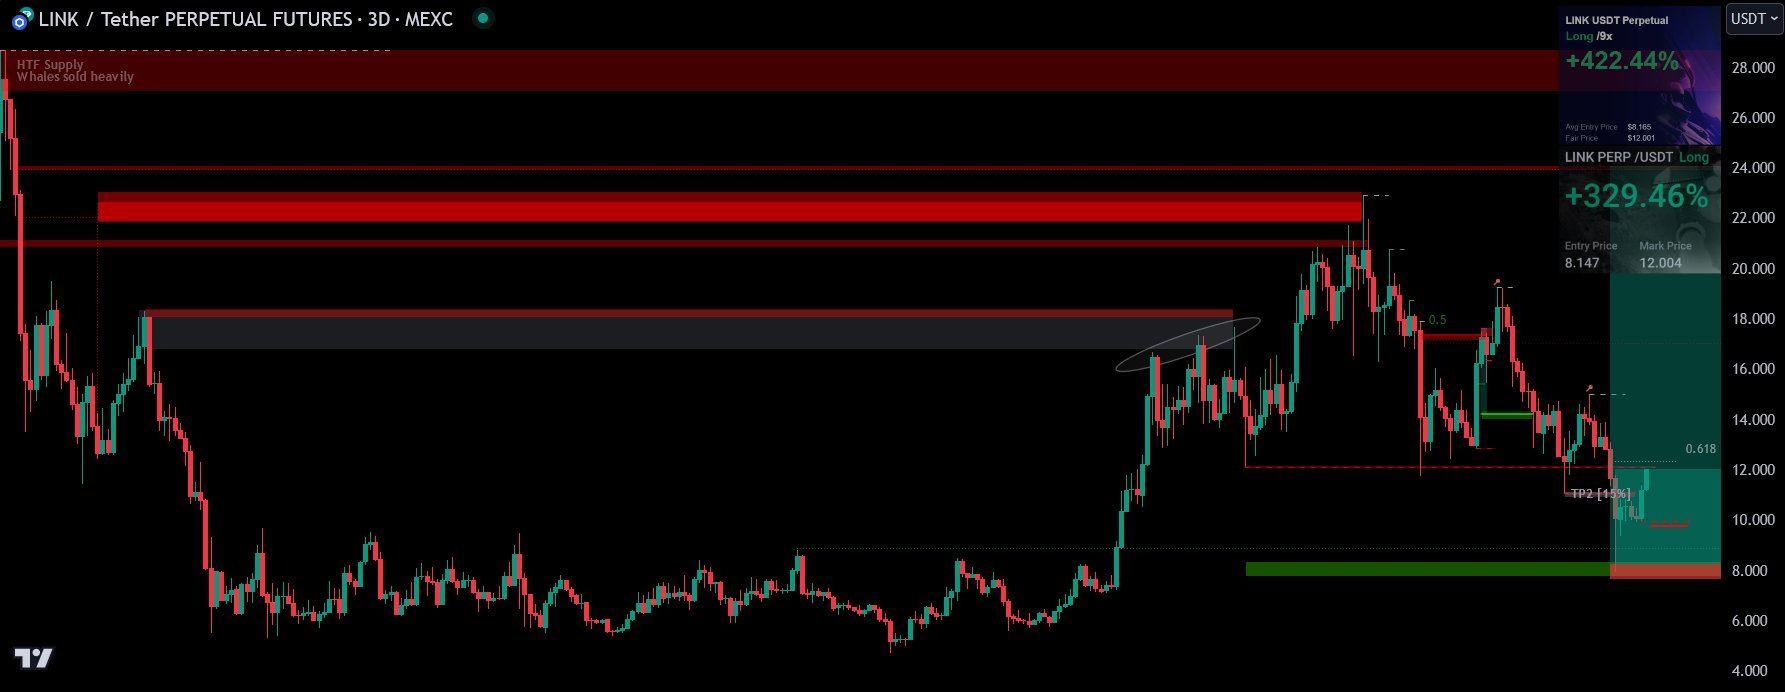
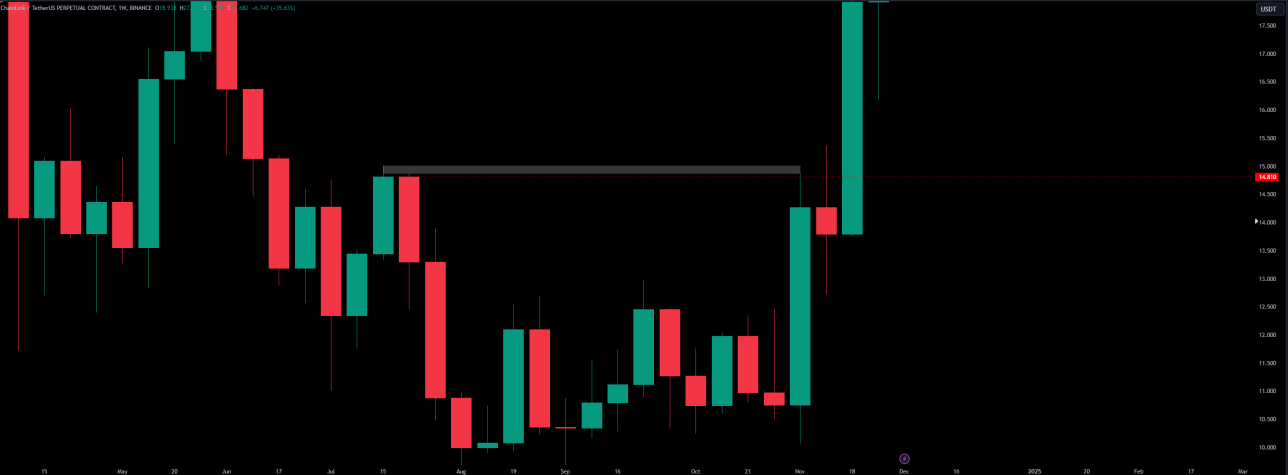
Following the rules: no HTF BBs/HOBs nearby, only a partial 1W which isn't strong, so we use S/D principles.
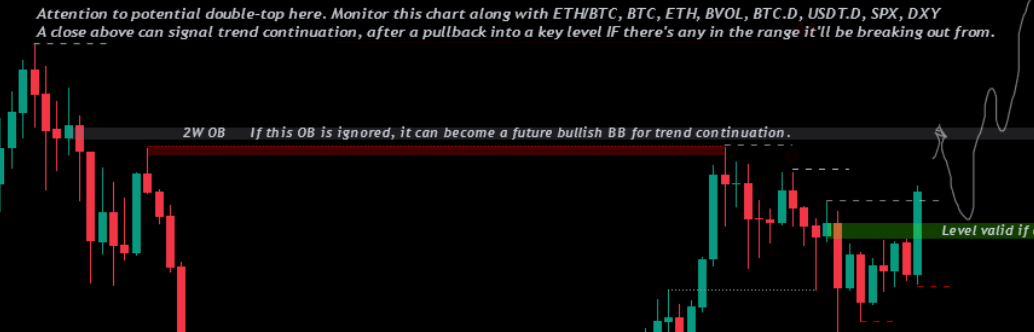
We find a 1W supply zone — 7% wide, or 9% if we include the double top. Refine and highlight the fresh wick:
The fresh wick is tight (1.5% SL) and on a high TF, so no further refinement needed. This is the zone to short — hence the red color. We didn't get this one in this case, and once a level reacts as expected, we don't replay it on a retest.
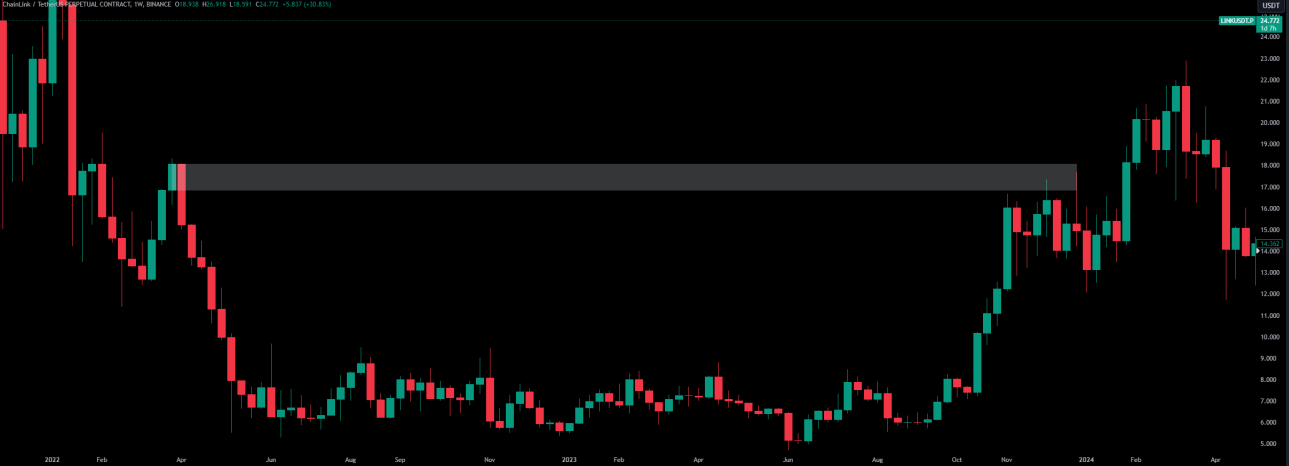
Link Supply Zone (Top of the Zone Shorted)
Same drill: no HTF BBs, so SD principles. Refine using FWs and fibs.
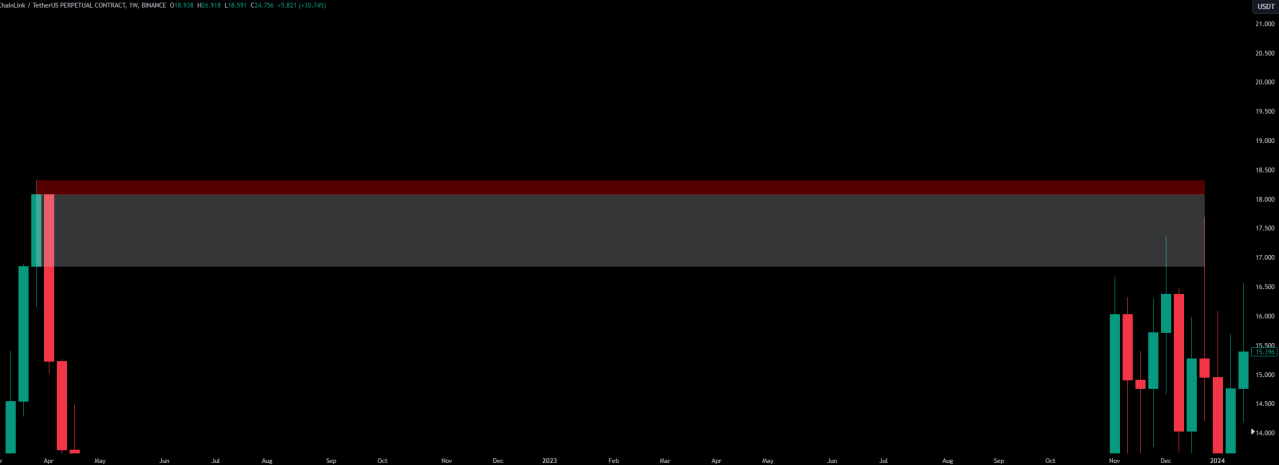
We see a FW on the 1W and 1D. Add a line where the supply bodies end:
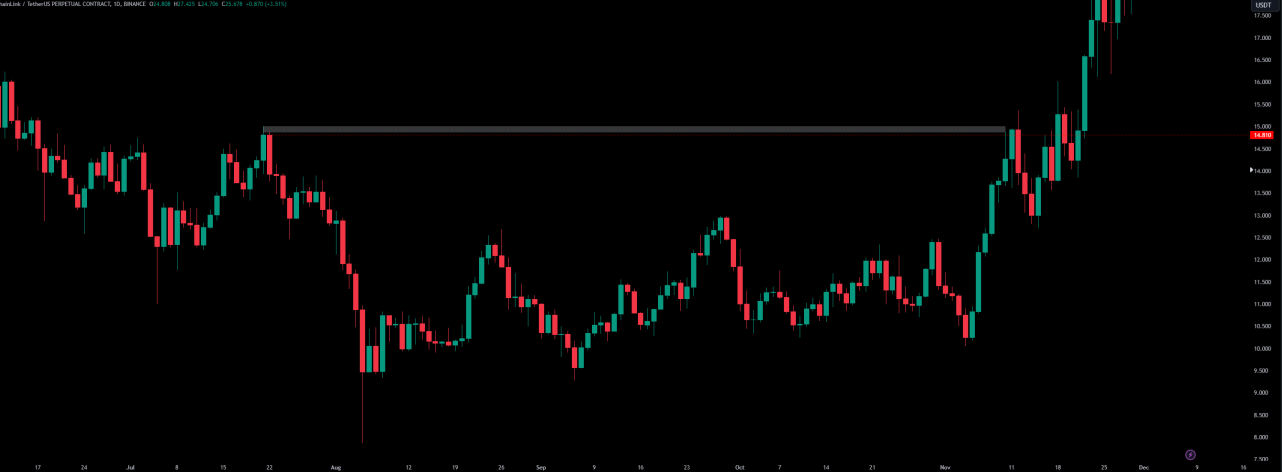
The supply bodies could refine from 1D body down to the 10H or 8H bodies, but ultimately only the weekly and daily FW got shorted.
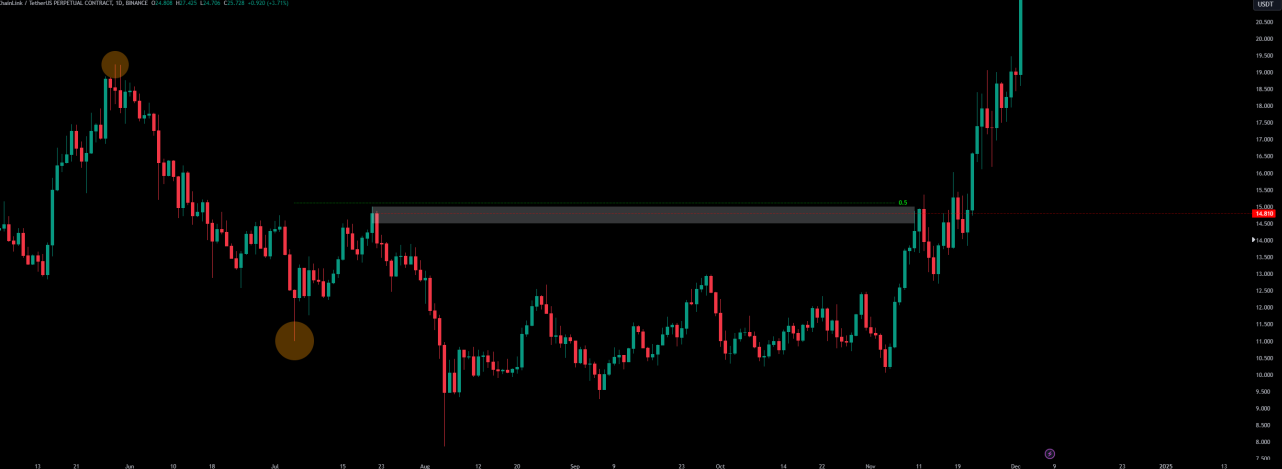
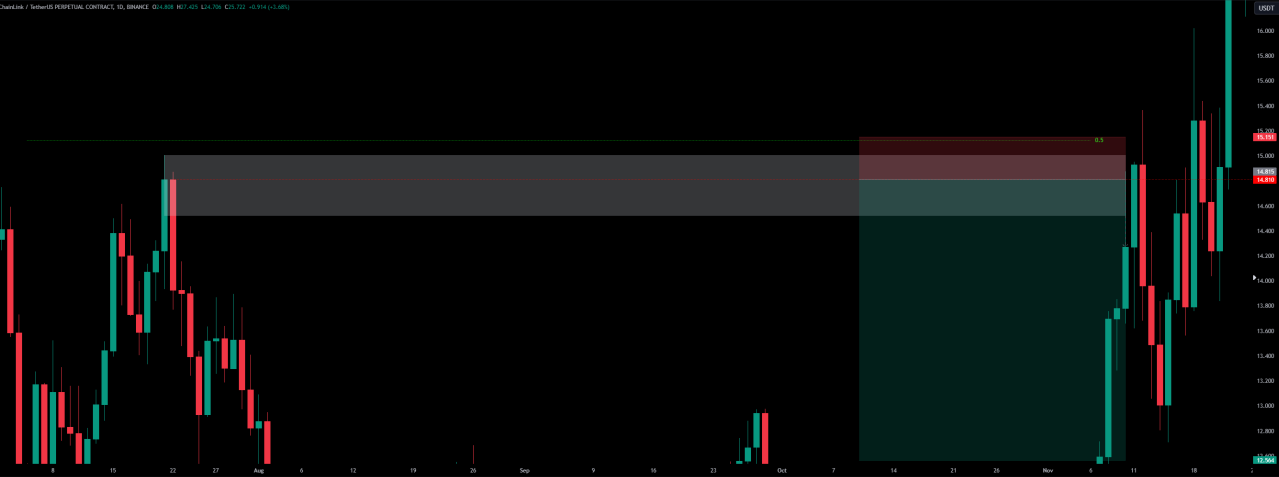
For the SL: there's a close 0.5 of the previous swing that was likely to be tapped, so the stop goes above that rather than just above the FW supply — 2.2% SL:
Silver Supply Zone
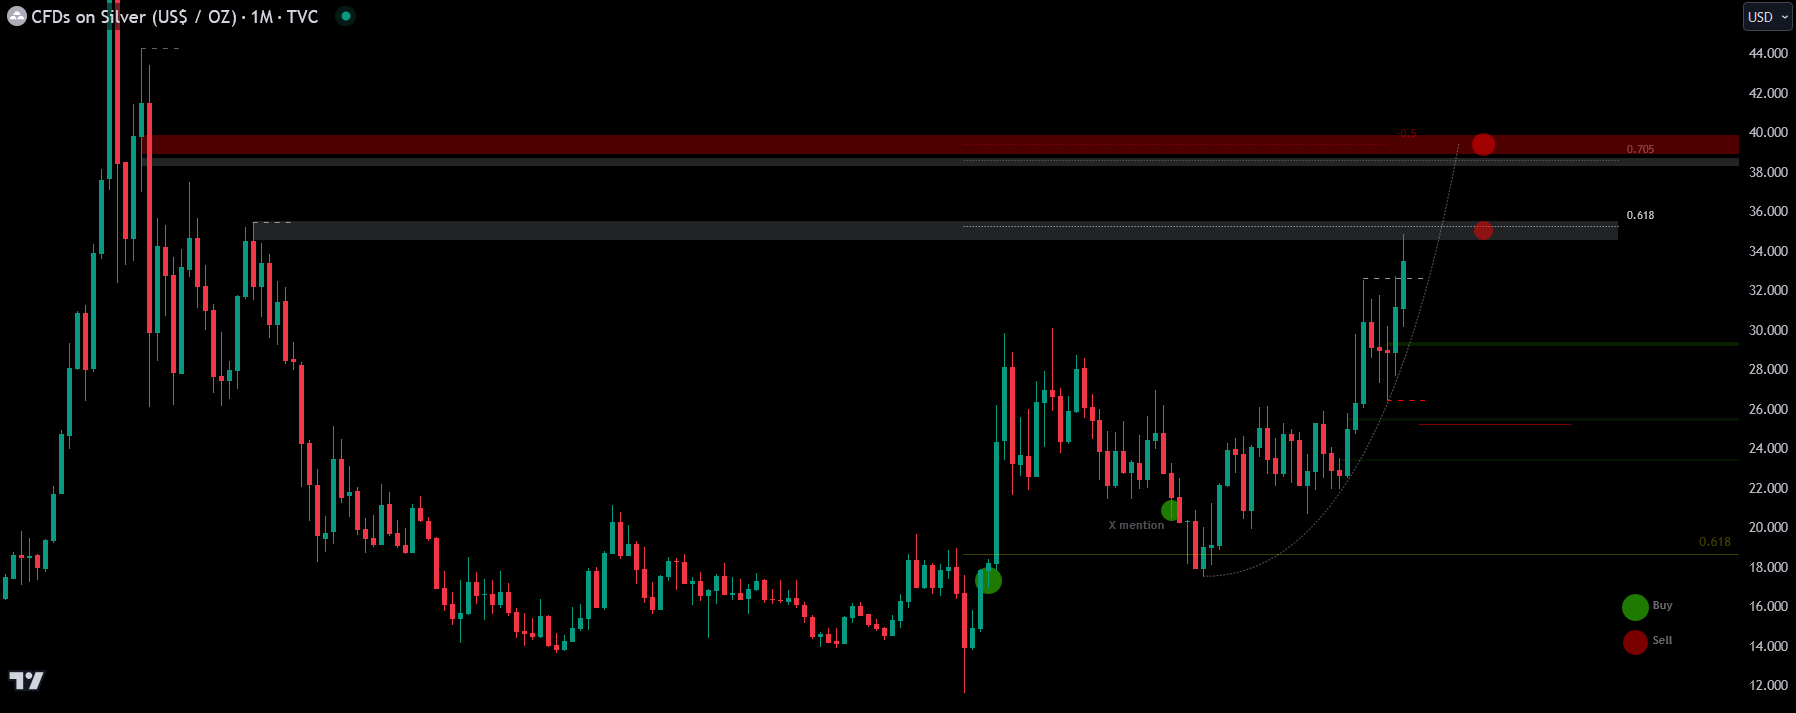
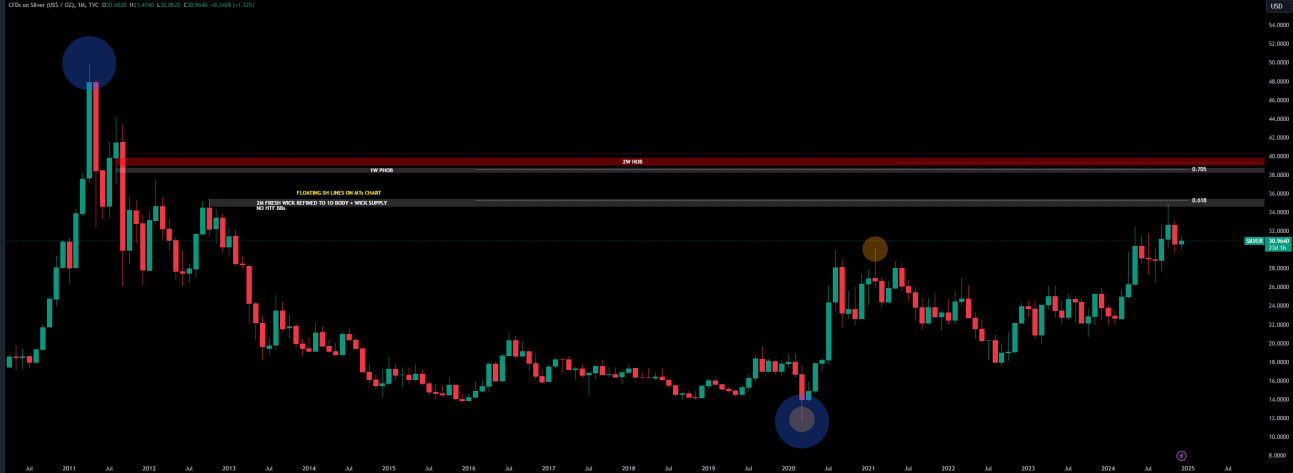
Starting from 3M TF, look for hidden liquidity / BBs / HOBs. None. So: SD principles, refine FWs with fibs and OBs.
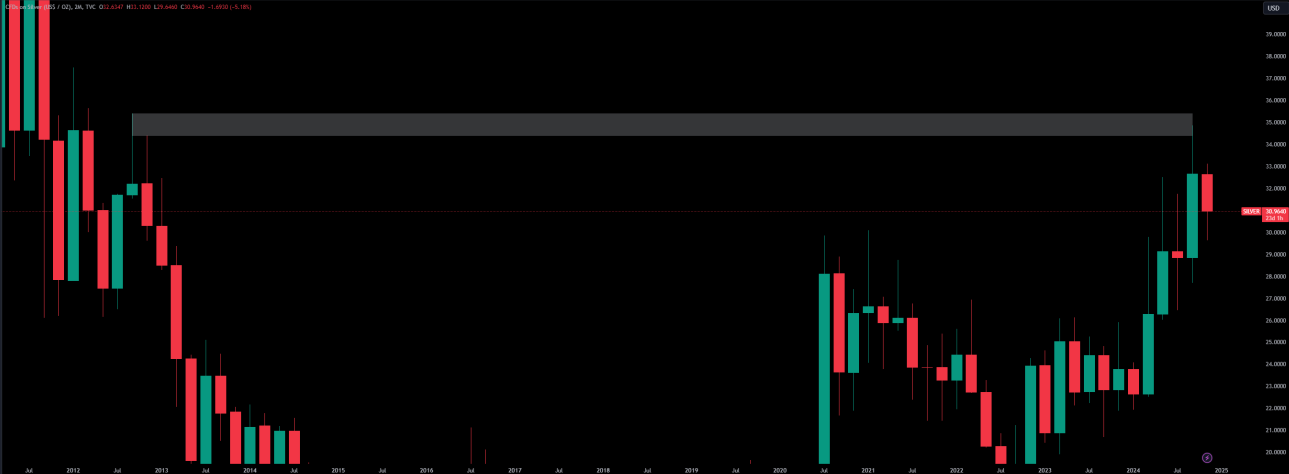
On the 2M TF we see a FW — that's our supply zone. Refine further:
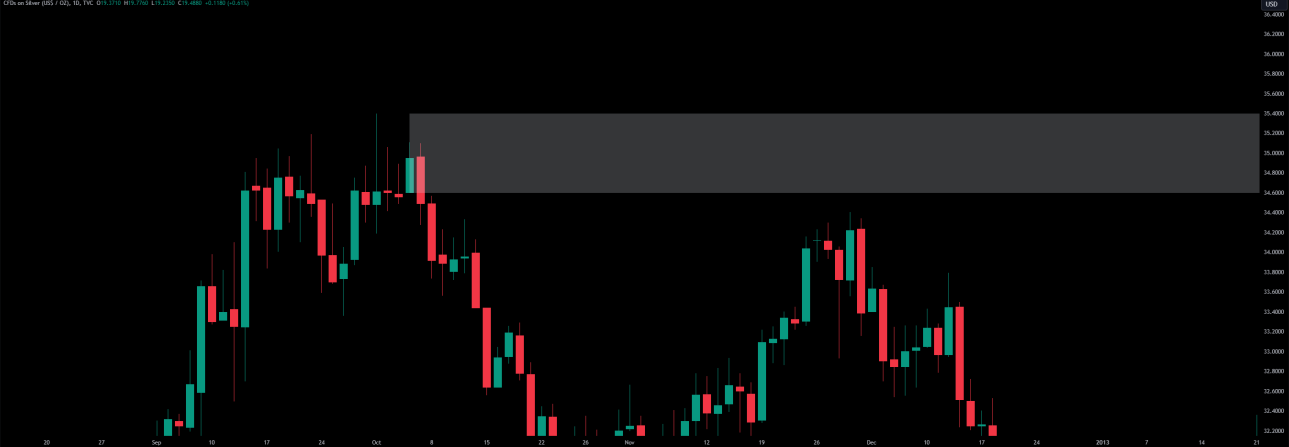
Going through lower HTFs, we don't find more FWs, but we see bodies inside the FW we highlighted. So we pull the supply down to just below those bodies. Continue until the 1D body — that's the tightest possible refinement.
There's also a fib confluence of the whole HTF swing at the supply level (the blue circle swing). The upper levels are HTF BBs.
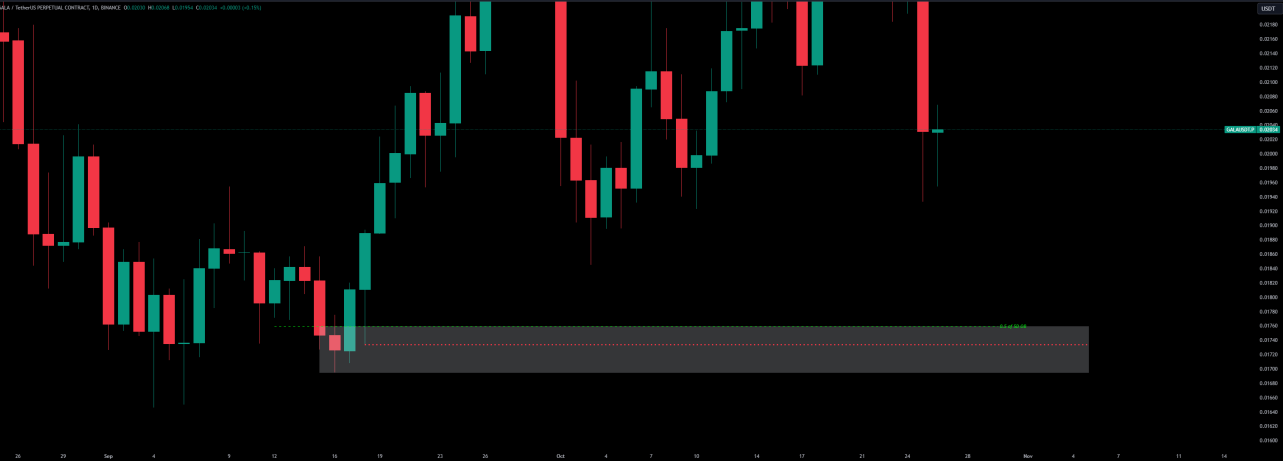
GALA HTF Demand
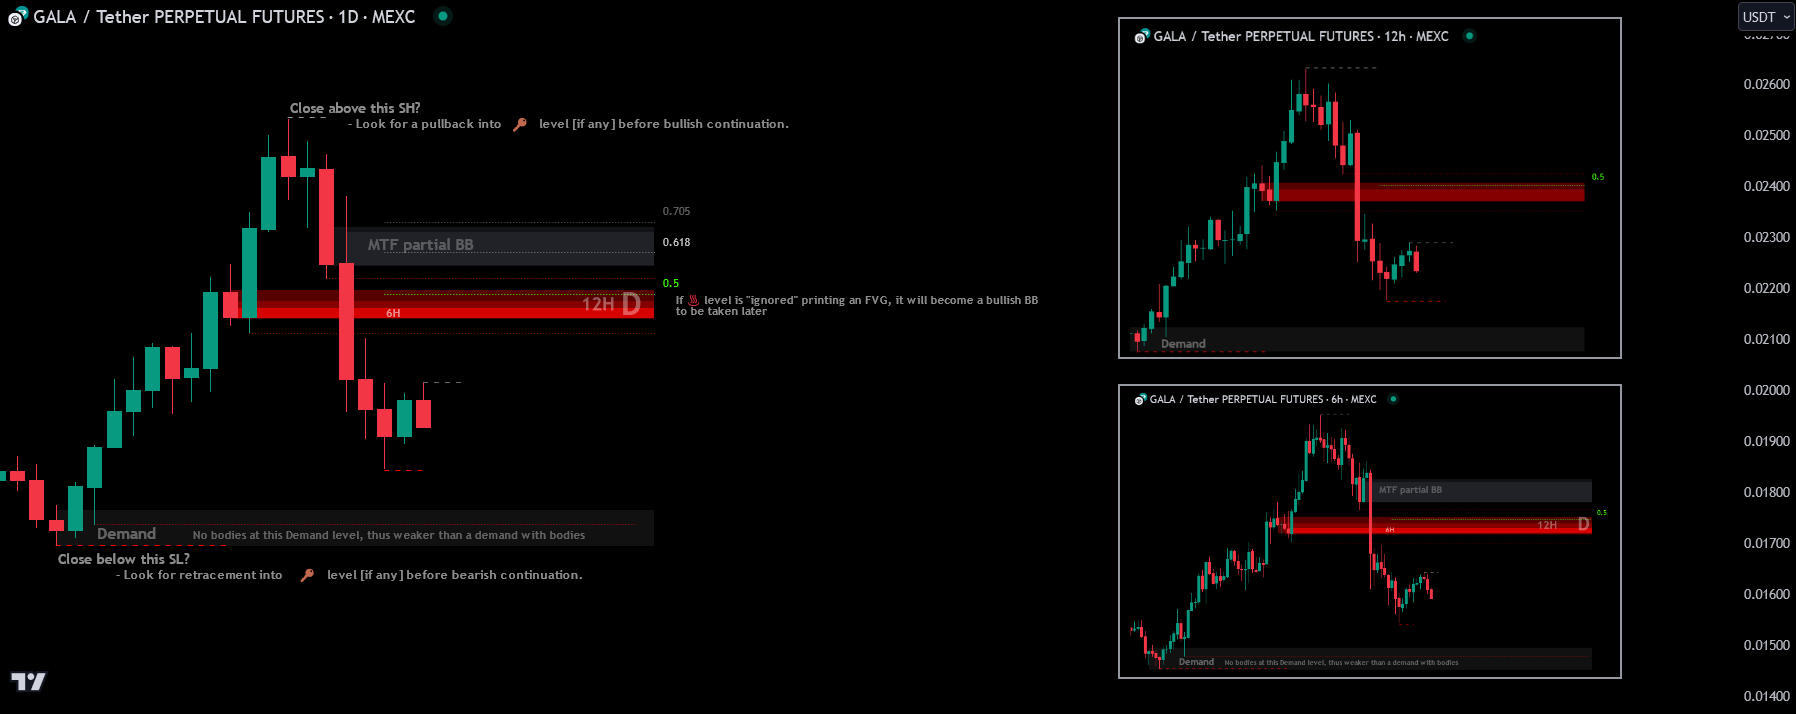
No HTF BBs to long. So: SD principles, refine using FWs and 0.5 of OBs.
We find a FW on 5D and 4D, and another on 3D that's slightly wider. Highlight all of them, but add a separating line — the tighter one is stronger:
Why this FW over all the wicks below it? The only supply with fresh untapped HTF bodies is this one. That's why we refine into it.
The 5D and 4D FW alone gave a sniper entry before the explosive move up. The level was kept slightly wider to make sure to catch the move. Going to lower TFs, no strong nearby bodies. Going to higher TFs, the 5D OB / supply is the highest TF body in the zone, the most compact, and the closest to the bottom. So we compromise: include the 0.5 of the 5D supply with the FW area, separated by a line.
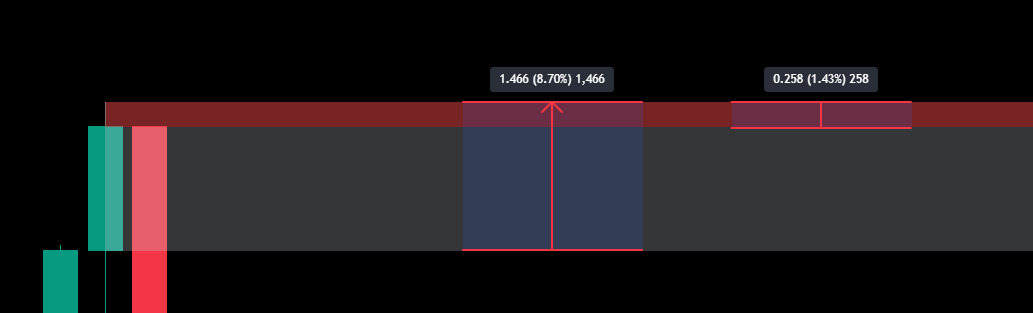
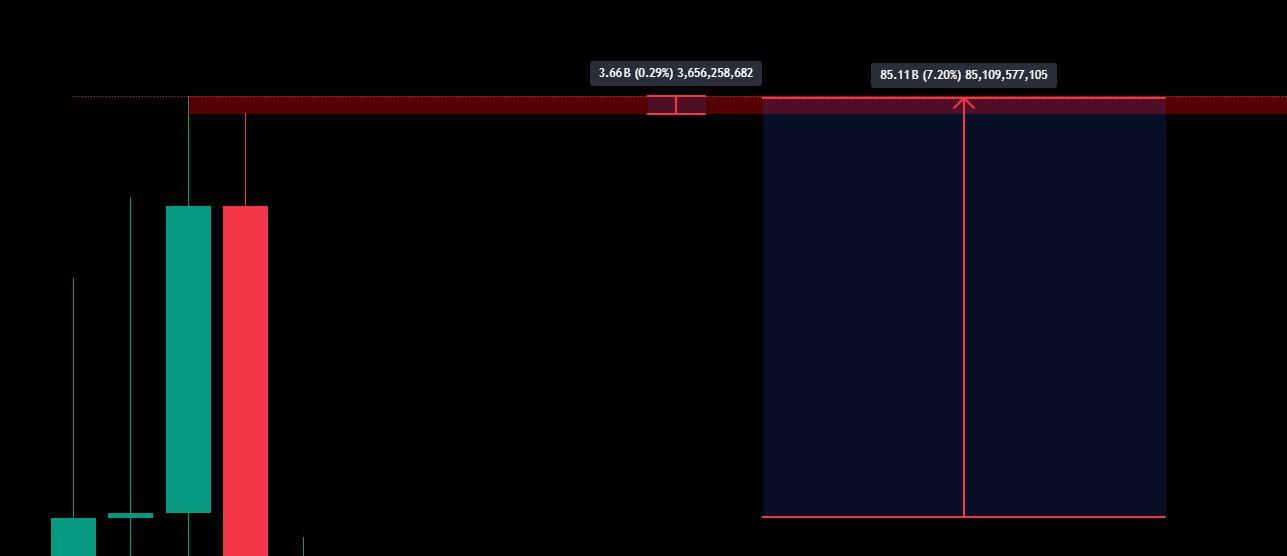
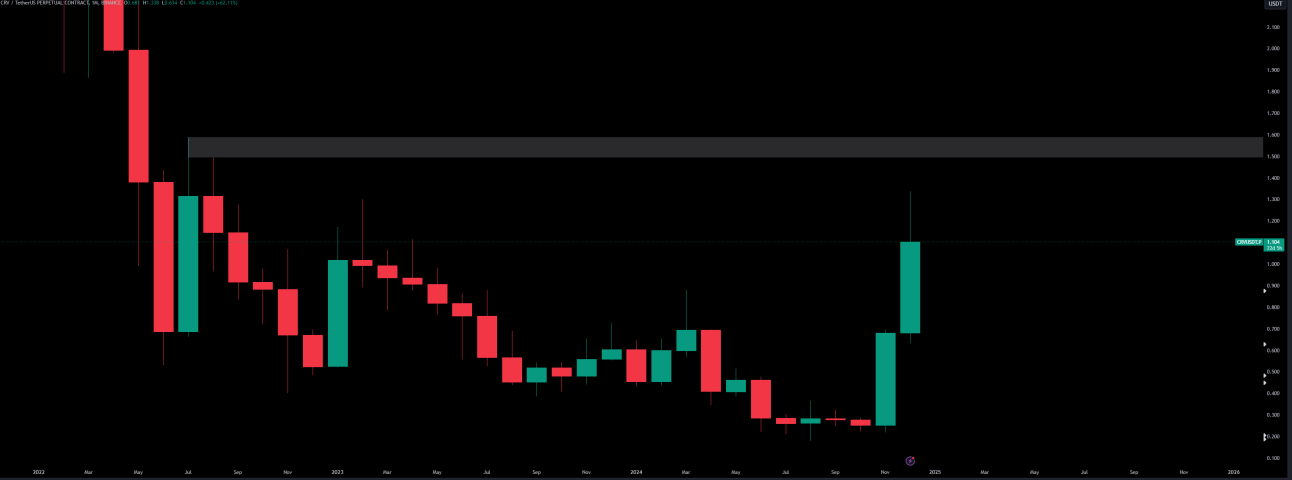
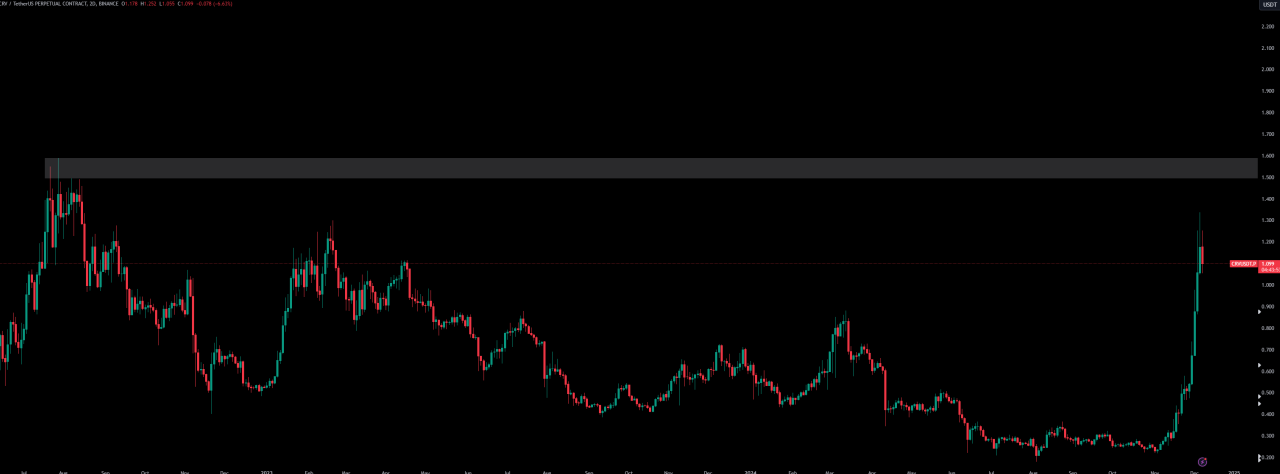
CRV HTF Supply
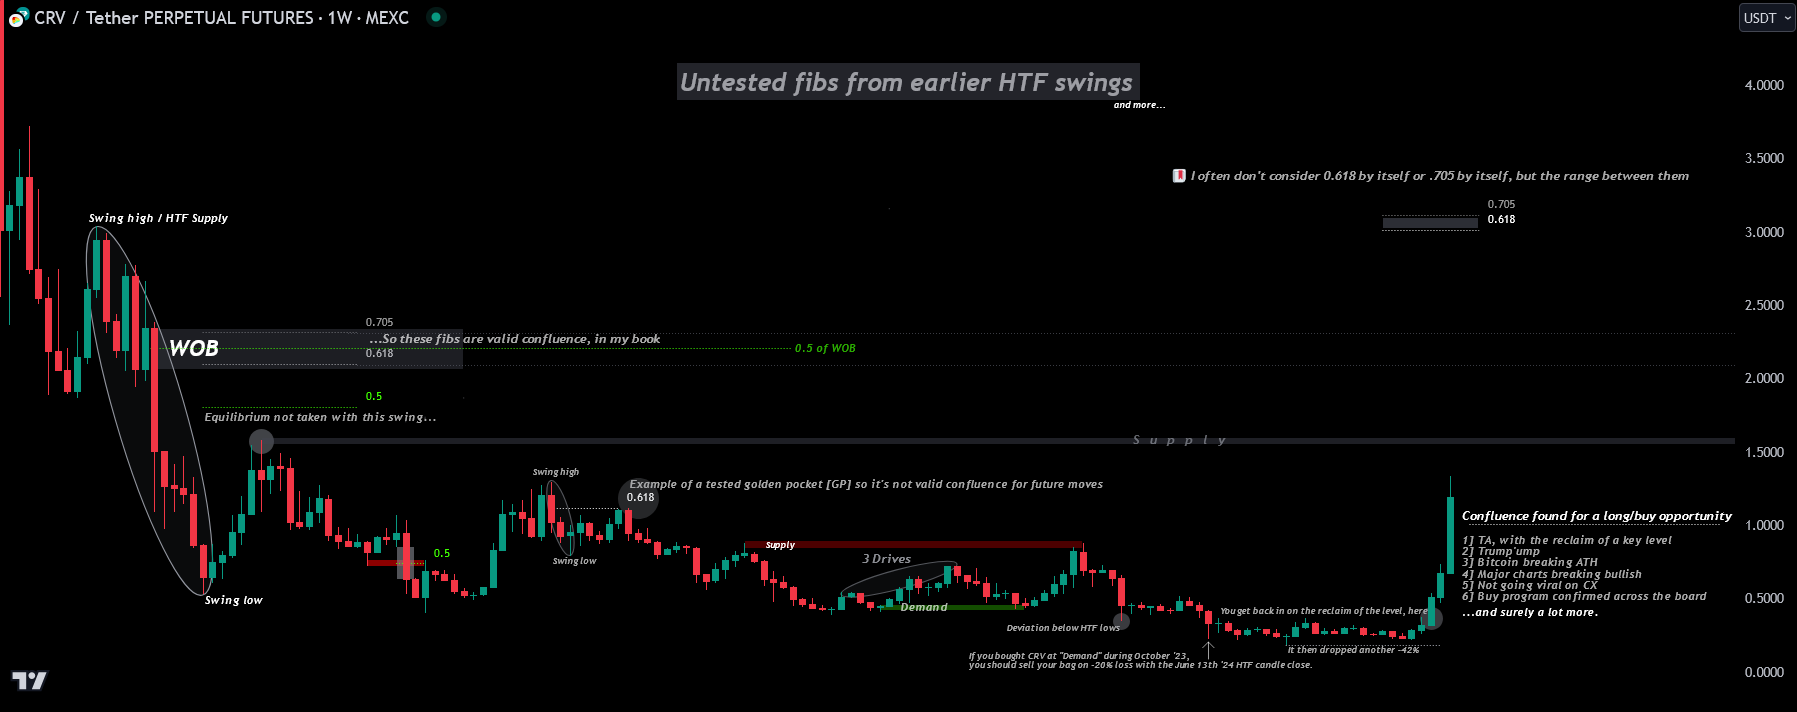
No HTF BBs. SD principles + refine.
We find a 1M FW with 5.7% SL. Going lower, this FW is intact from 1M all the way down to 2D — extremely strong:
On the 1D we find two small wicks visible all the way to LTFs. To refine further, our only option is to refine to a wick with no bodies — inside the HTF FW we found:
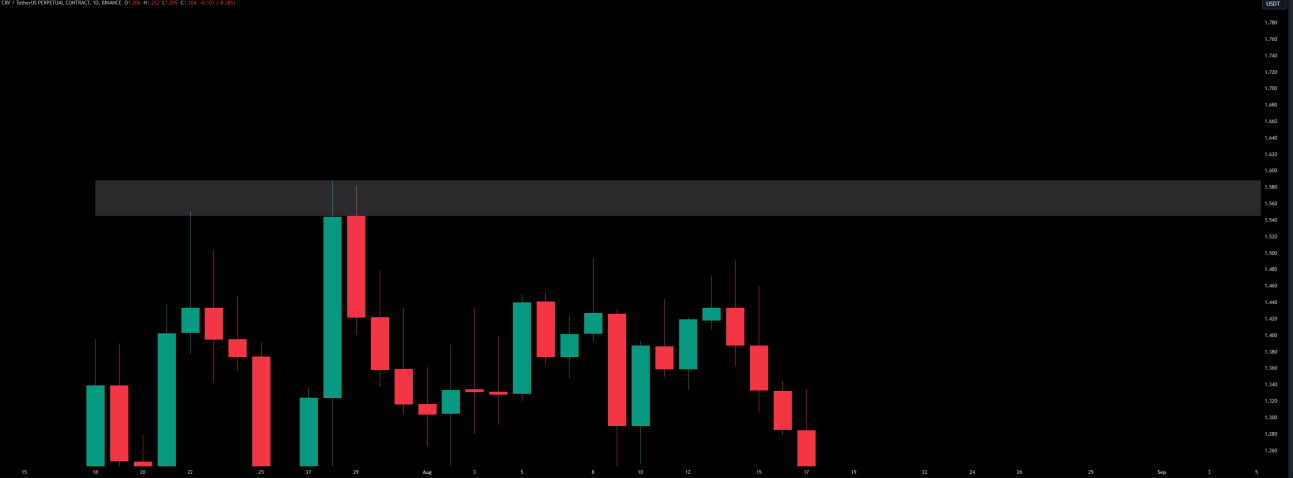
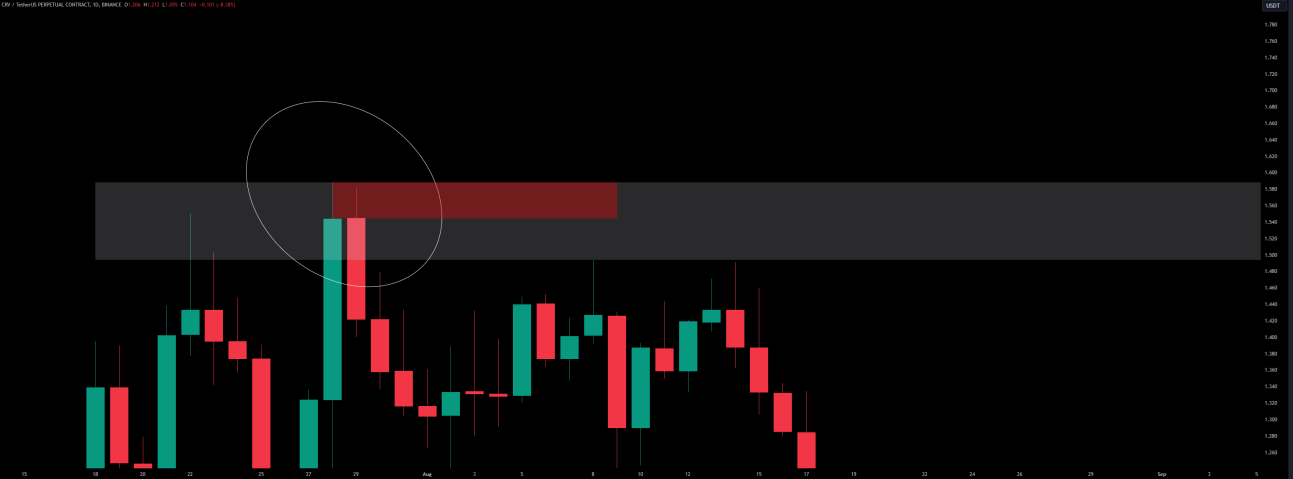
That's the most refined level in this supply.
A JASMY Note
A long setup on JASMY (mid-Dec 2024) extended the zone to grab the 0.786 inside it.

Using the overlay, it's the 1D FW exactly — top and bottom aligned. That FW was a perfect 2W HOB in the making, hitting 1-to-1.
Practical Notes on Selecting Levels
A few practical things from working through hundreds of these:
- Use monthly increments, then weekly increments, then daily and so on. Don't scan every TF from D30 to D1 — that's too much noise. Fewer, cleaner TFs work better.
- If you take all the supply and demand levels, the chart becomes a mess. SD-only traders don't usually win for that exact reason.
- Differentiate between levels that were played (longed/shorted) and levels that were just pointed out. A level being on the chart doesn't mean it was traded — sometimes it's just being marked.
- We should also mind simple double top / double bottom and range high / lows for basic supply and demand levels.
Refinement: HTF → MTF → LTF
REFINEMENT proper. The whole point of refining is this:
Refinement is used to maximize your R/R. Refine your levels and you get a tighter SL, which means you can use higher leverage and bigger 🔷Position Size for the same dollar risk. 🔷Risk Reward
The more you can refine the HTF area, the more powerful the area is.
Workflow: HTF > MTF > LTF. Always start at the HTF and work down. You will need to check 10 to 20 different TFs when refining. It's tedious at first, then it's second nature.
The general TF map:
- HTF: M > 2W > 1W > 5D > 3D > 1D > 12H
- Refining: 8H > 4H > 2H > 1H
- Ultra-refining for 30R+ opportunities: 1H > 30min > 15min
To confirm a level: HTF (refined) > MTF (refined) > LTF (refined) > MTF'. Look past the FVGs and refine through TFs. Always use LTF's to refine as needed.
⭐Starting Analysis: if there's enough data on the charts, always start from Weekly (or Monthly if data allows) and work all the way down to confirmation entry TFs. If you don't find enough confluence on ♨️Key Levels🗝️, change chart — there are 1,000+ coins, many with great setups.
If you stay only on HTFs, you're blind to LTF hints. If you stay only on LTFs, you miss the weekly and daily FVGs with hidden untapped key levels behind them. Retail plays blind because they don't know what to look at.
Tip: When highlighting your box (red/green), set opacity to 25–50%. As you refine deeper, the shade gets brighter and brighter, showing where liquidity is most likely to be taken.
When to Stop Refining
This is the judgment call. Refine too far and your level gets front-run — price wicks into the HTF key area, never reaches your ultra-refined LTF zone, and you miss the trade.
The reversal level there is clear to me. Seen it too many times. I refine when it makes sense to do so and when I'm able to through lower timeframes.
Sometimes the HTF level alone is clear enough. You don't need to refine to LTFs every time. Getting Frontrunned is the cost of being too zoomed in. It's all part of Play the Game🎮 — a game of probabilities.
Refining Above vs. Below the HTF Area
- When refining HTF shorts, prefer the refined area to have a higher price than the bottom of the HTF area.
- When refining HTF longs, prefer the refined area to have a lower price than the top of the HTF area.
If the HTF area and the refined area both sit at near enough the same price, you'll end up using the same SL to cover the full HTF area anyway — the refinement bought you nothing. Riskier traders place the SL inside the HTF area to boost R:R. This is where you have to know what kind of trader you are.
Don't refine outside of your newly refined area — that defeats the entire purpose. You refine inside the previous box, and so on. Marking other points of interest inside the HTF area is fine, but it tends to lead to confusion.
Worked Refinement Examples
BAKE

A common question: Why didn't you refine to a lower TF? I would have gone lower, but the entry would have failed. When did you choose to stop refining?
Didn't need to. The reversal level was clear from experience. Refine when it makes sense and when you're able to through lower TFs.
$SEI
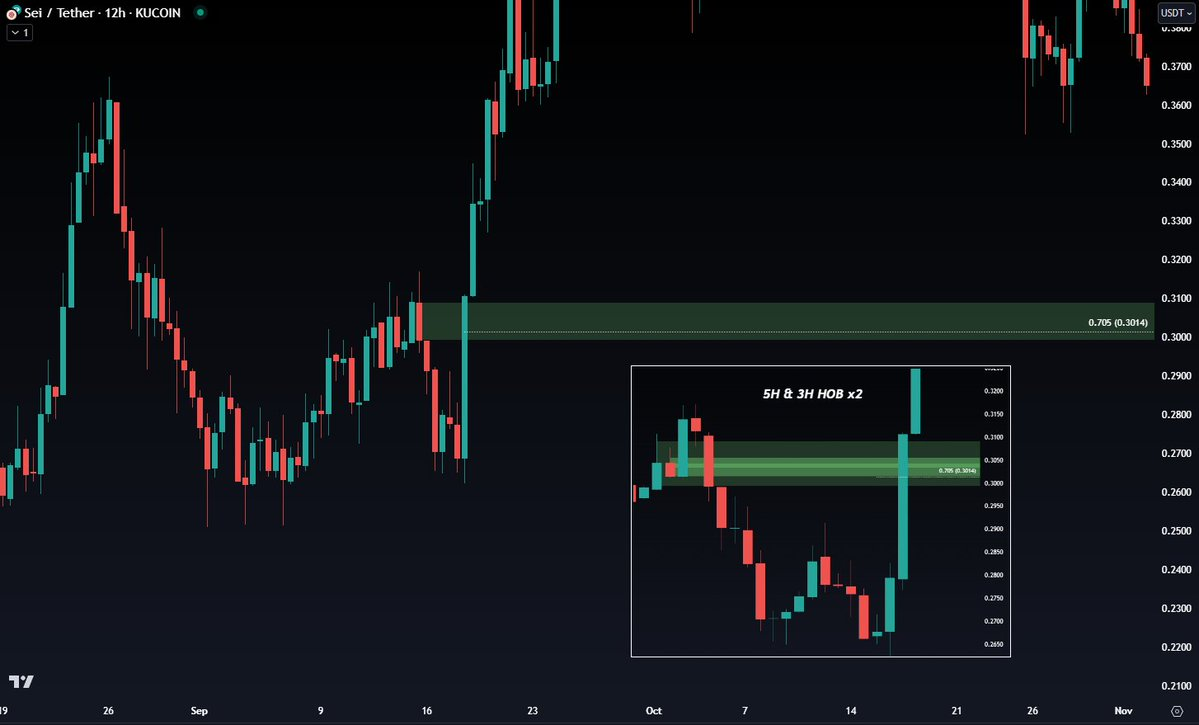
We have a 12H HOB + untested 0.705 fib level. Going lower we spot a 5H and 3H OB hidden by 2 FVGs — invisible to retail. Now the 12H green box has a brighter shade inside, showing where whales might be drawn. That's our refined entry instead of the top of the 12H HOB.
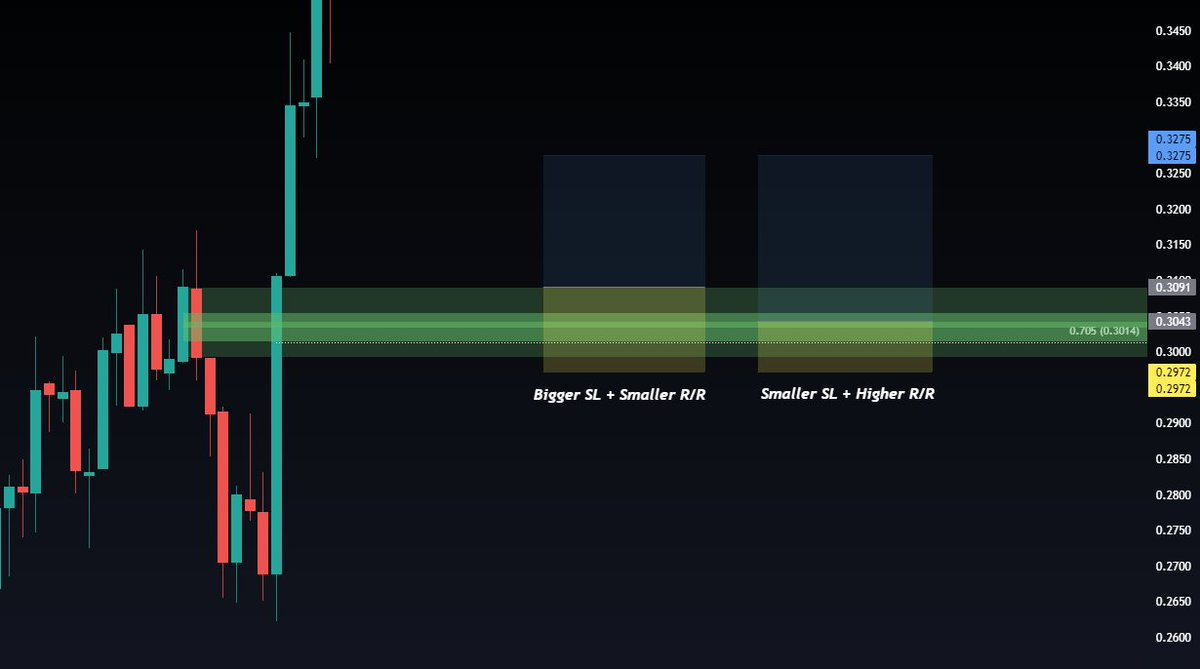
Depending on your style, you might widen the SL slightly above the refined entry — a safety net — but not so much that you destroy the R:R.
$AAVE
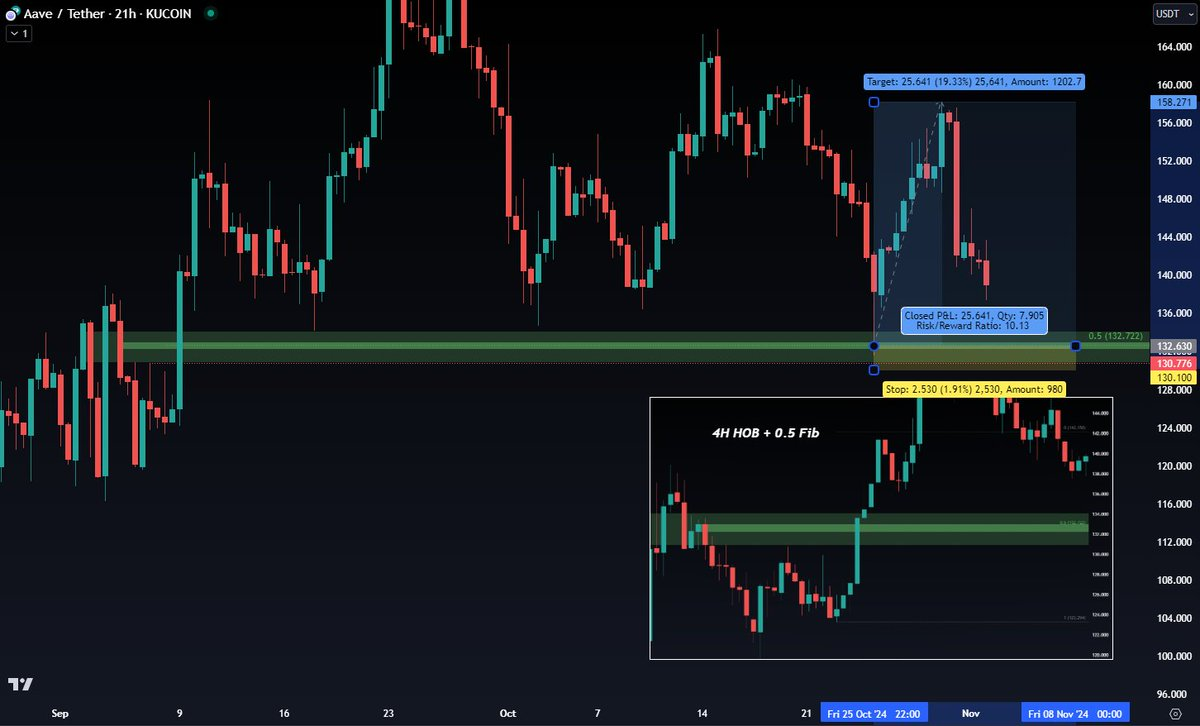
Starting on the 21H, we have an OB hidden by 3 FVGs — that's how key and hidden the liquidity is. Down to MTF, a clean 4H HOB inside the 21H HOB, lining up perfectly with the untested 0.5 fib.
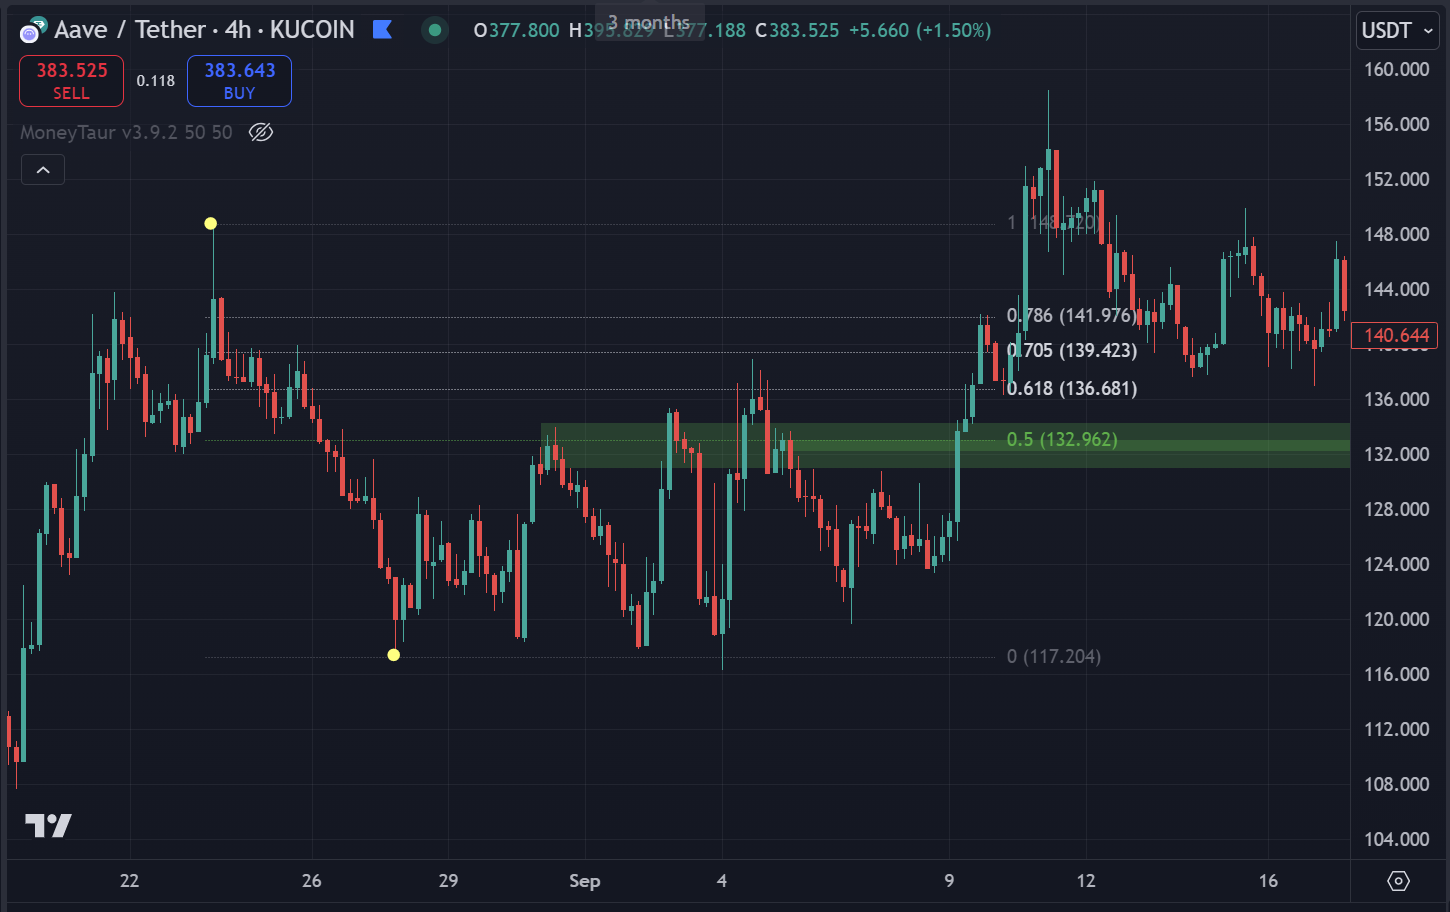
This is no coincidence. Refined entry, smaller SL, higher R:R.
The setup originally started with a 3D HOB previously wicked into only partially — meaning price could return to take the rest:
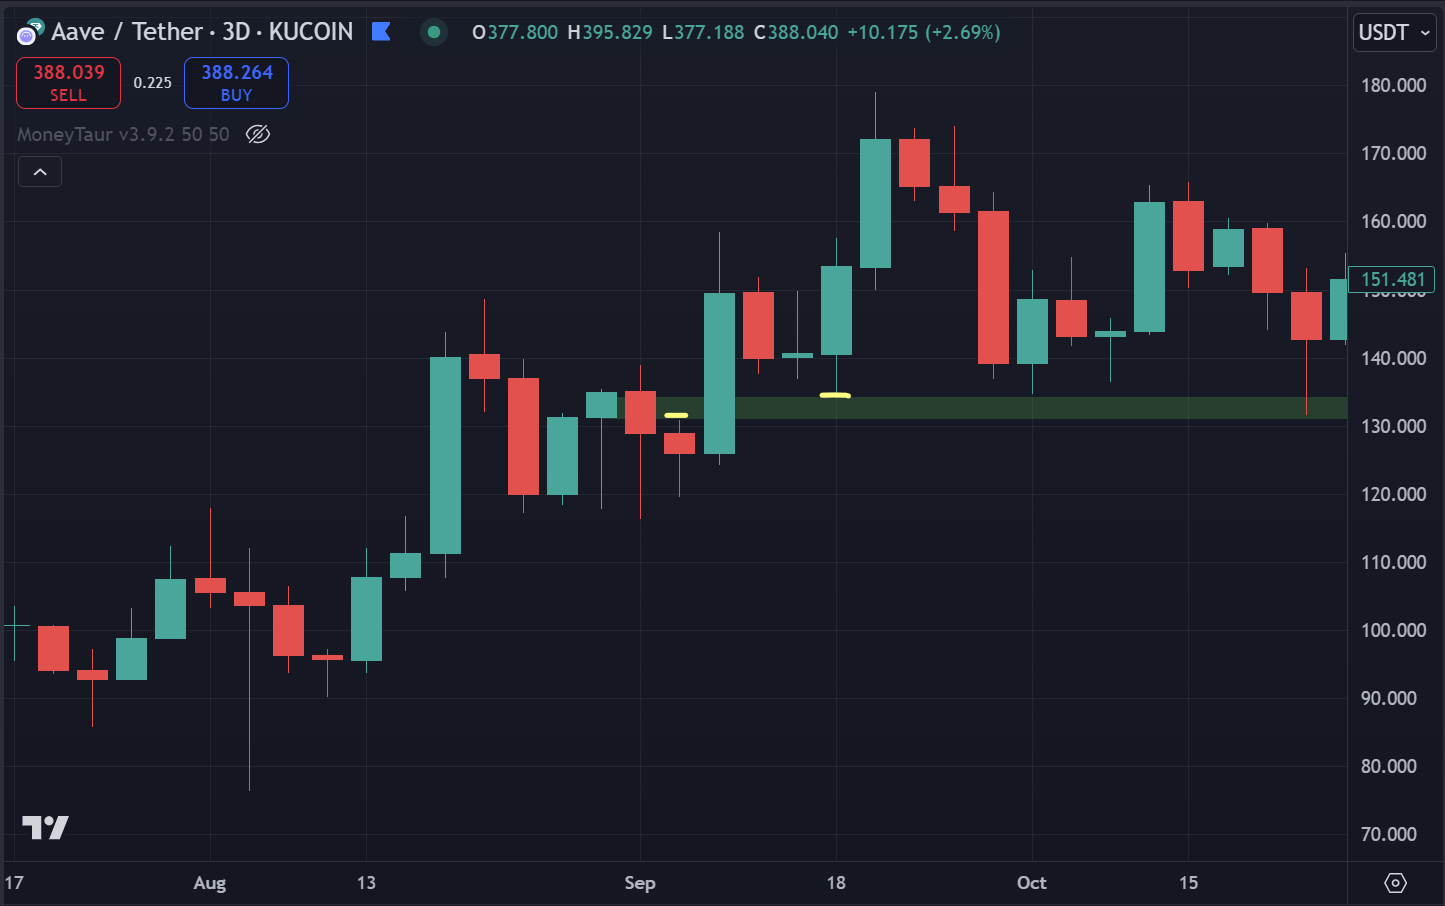
Two rules:
- Optimal HTF plays can be revisited more than once.
- If the 0.5 fib of the OB is taken, I tend to disregard the setup and move on.
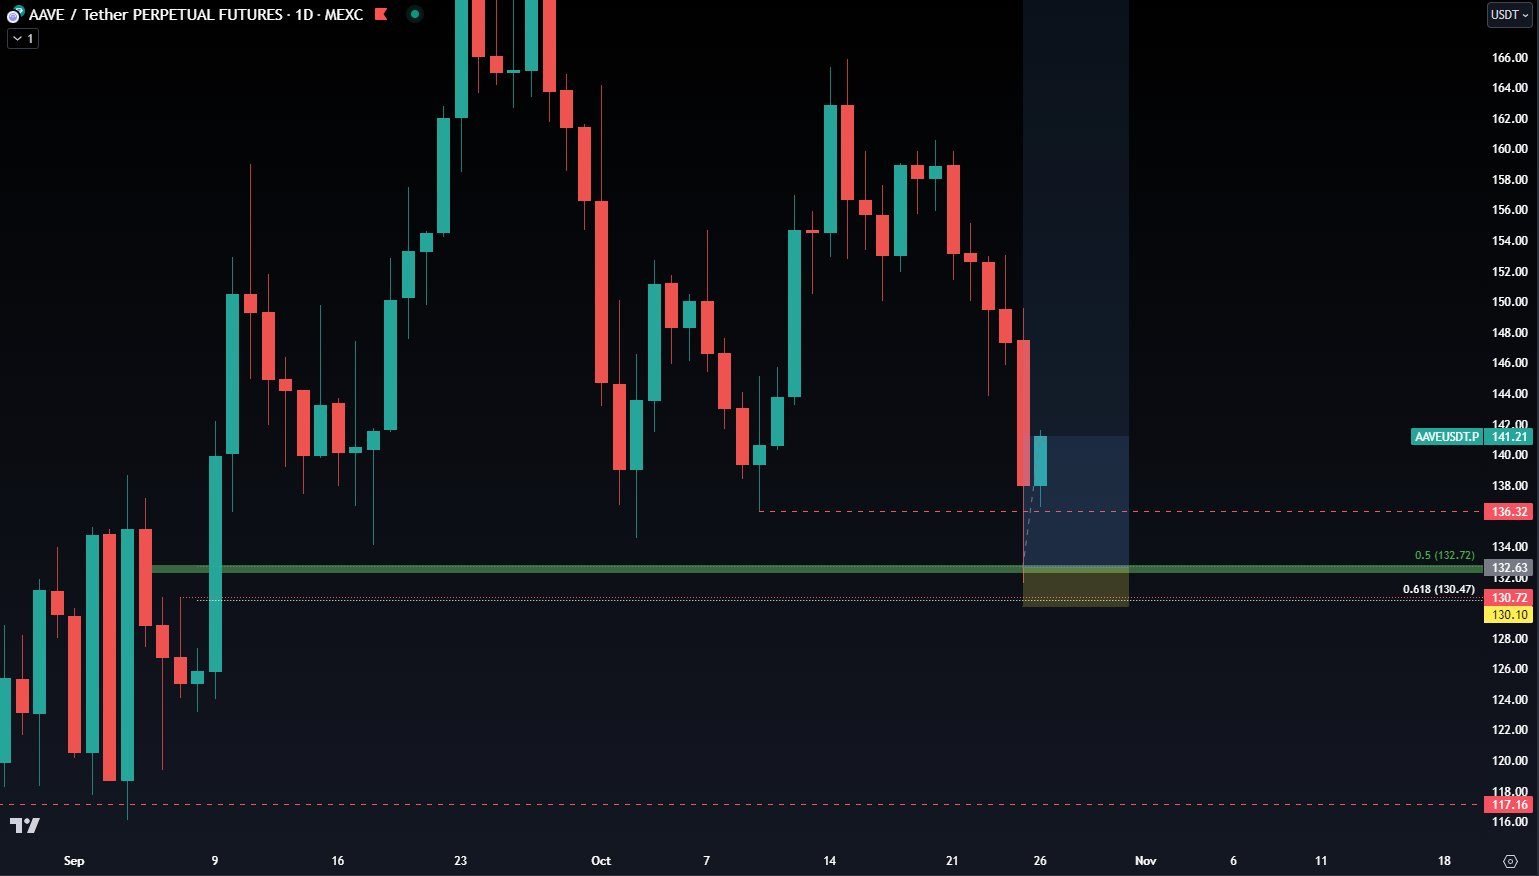
You can assume key liquidity areas are stronger when they line up with fib levels. Fib levels are only +1 confluence, but the more confluence the stronger the area — see FIBONACCI RETRACEMENT.
The follow-through:
$BTC — Bear Market
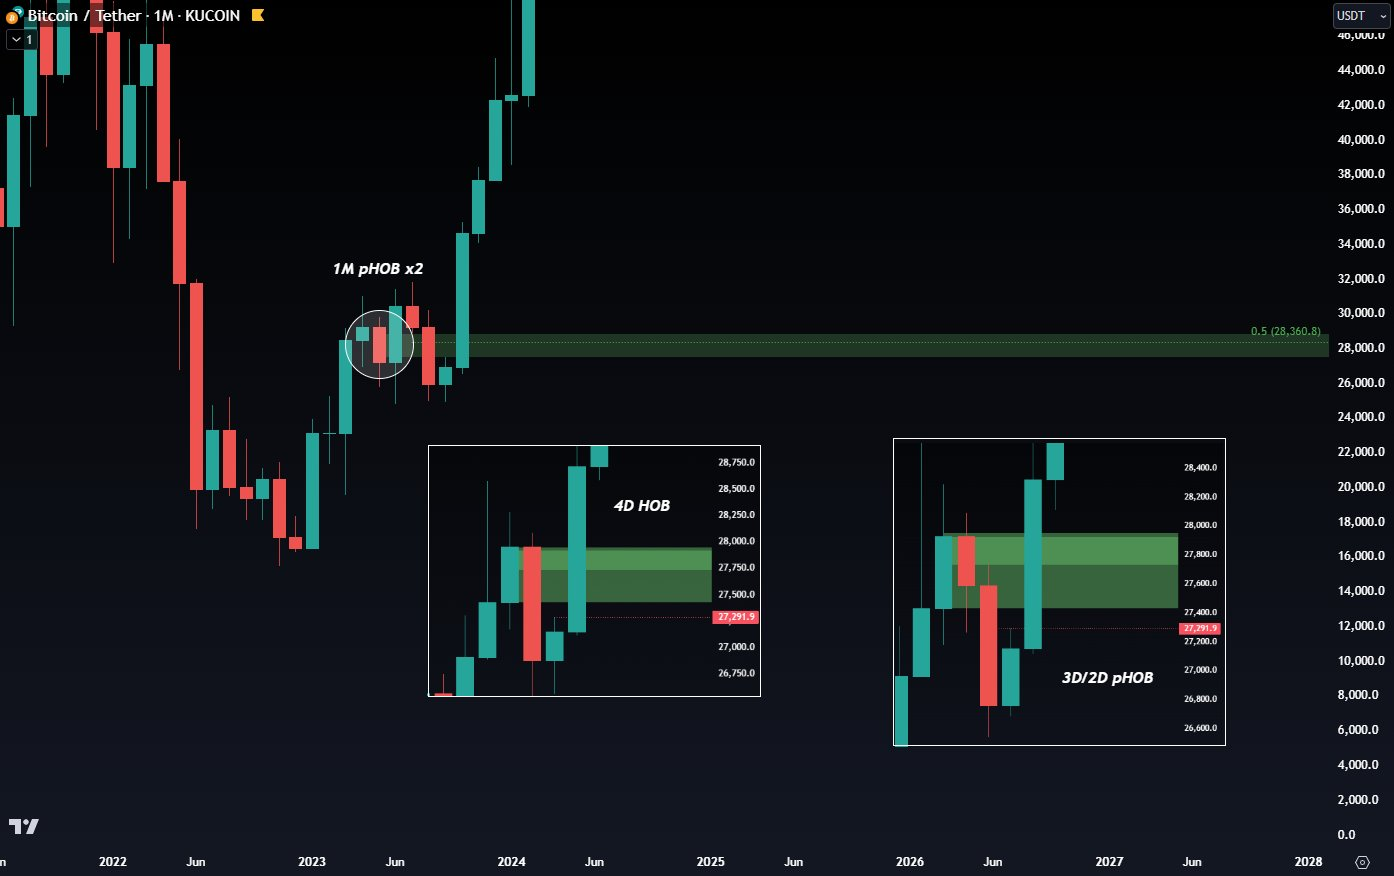
A 1M PHOB going through 2 FVGs with an inverse 0.5 fib as the key HTF area.

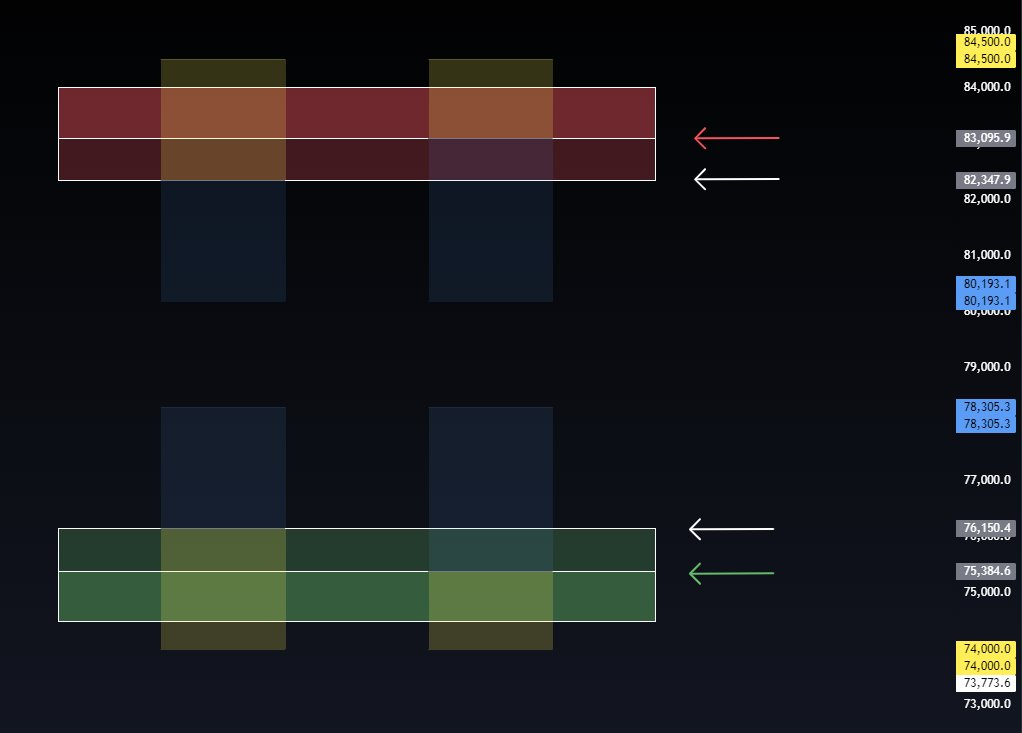
On the 4D we see a 4D HOB inside the HTF area. Inside that, a 3D/2D PHOB. Refine again — brighter shade where liquidity is most attracted.
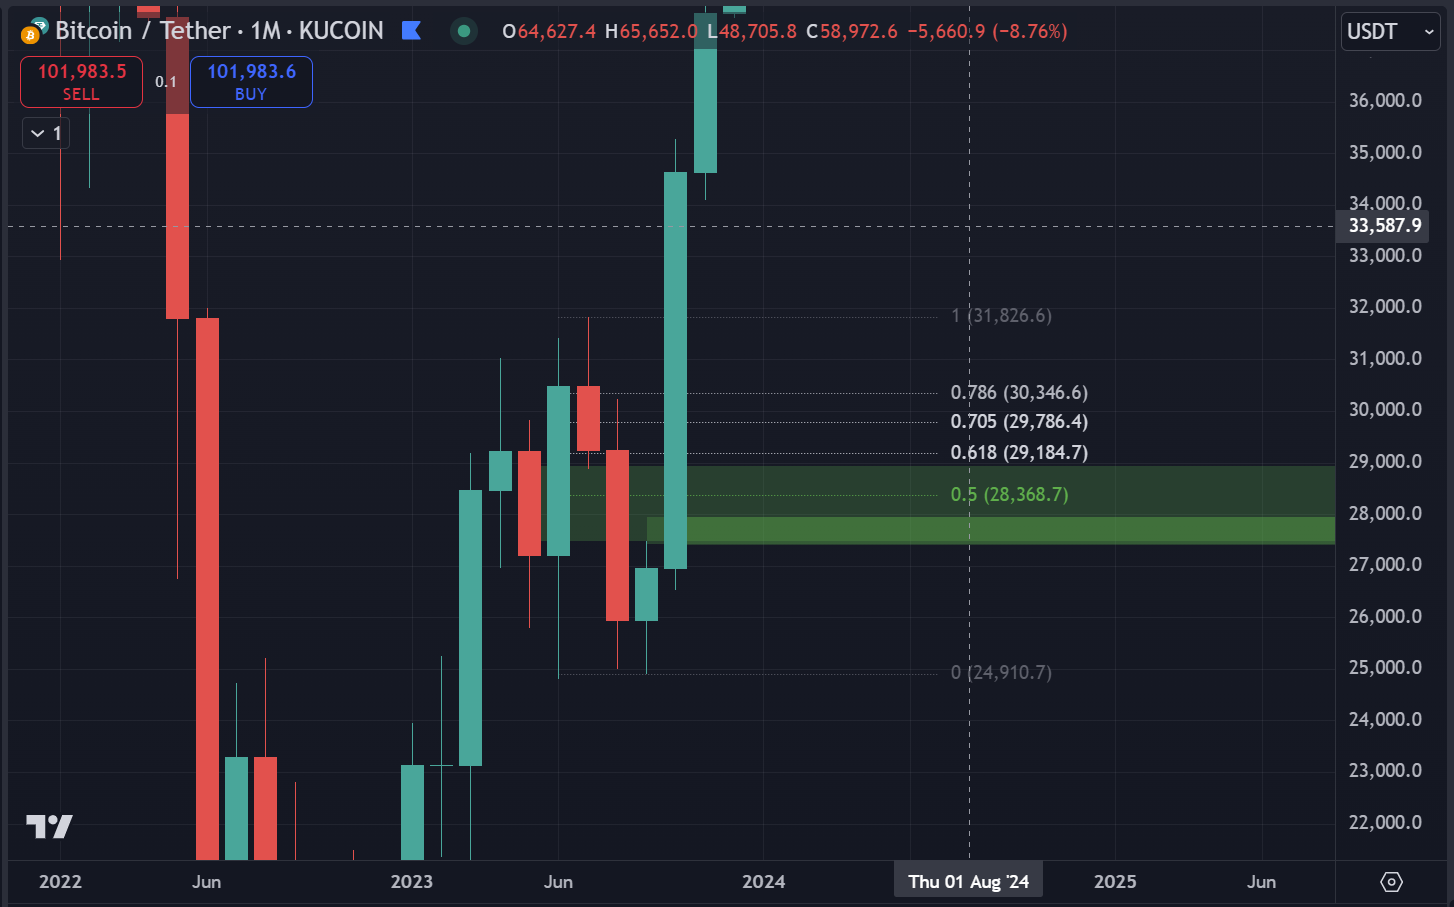
You can refine further into MTF/LTF, but don't get too focused on LTF — your ultra-refined area can be front-run. Personal preference dictates how far to go. High Risk = High Reward — evaluate what kind of trader you are.
A practical setup: a LO for the 1M PHOB, a MO for the refined area, and consider entering just above the refined area as protection against being front-run.
$BTC — Previous example
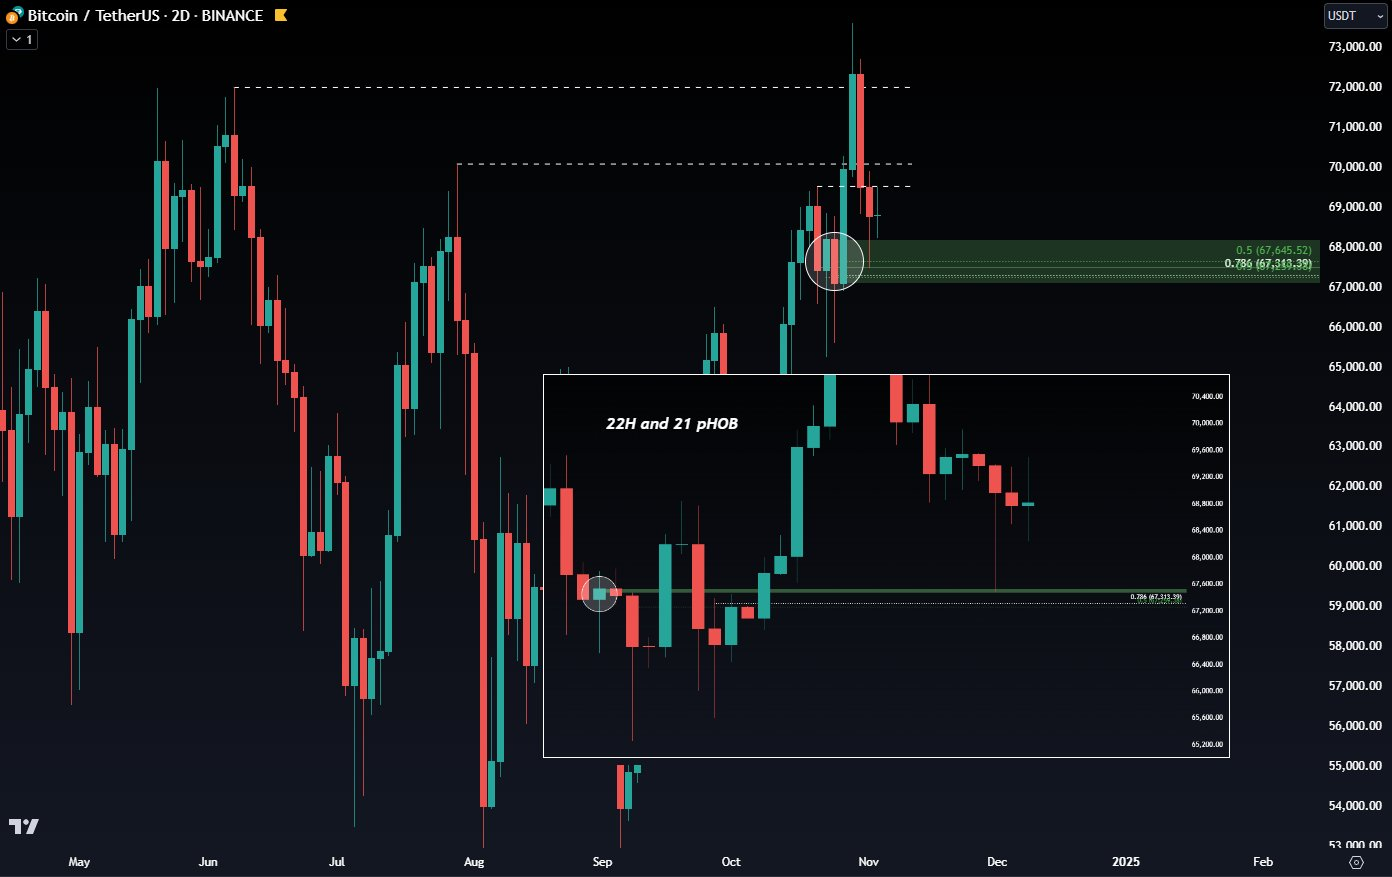
A 2D demand OB. After PA broke 2 PSHs, the 2D OB became somewhat relevant. Refining to the 22H/21H, we find a PHOB hidden by 3 FVGs. SL goes under the untested 0.786 fib and the 0.5 fib of the 4D OB (very close together).
If you don't have paid TradingView, you'll find it very hard to truly level up. And remember: PHOBs are weaker — risk less size. 🔷Position Size
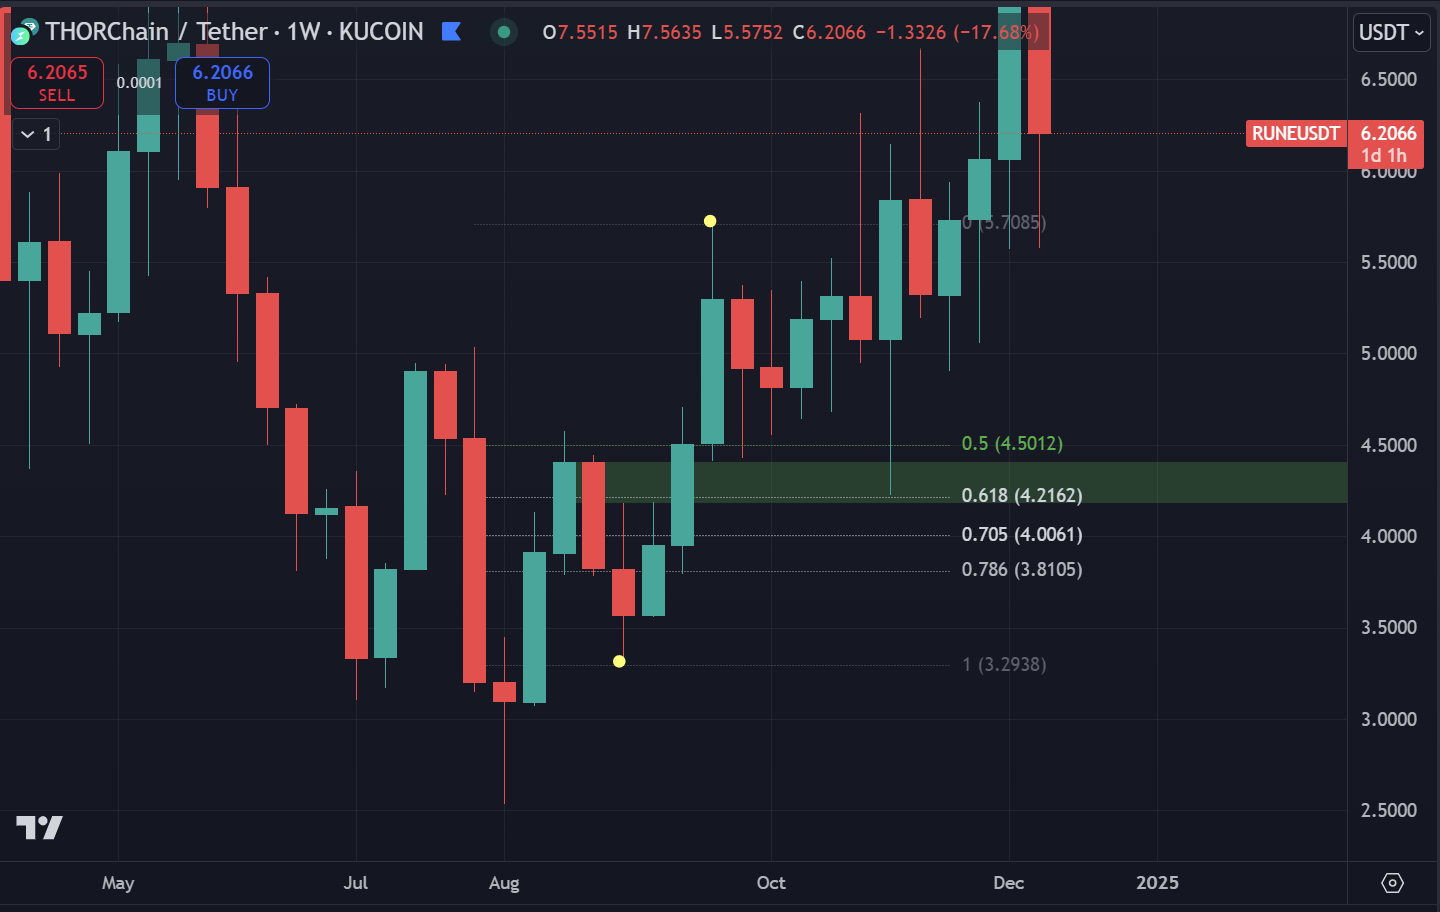
$RUNE
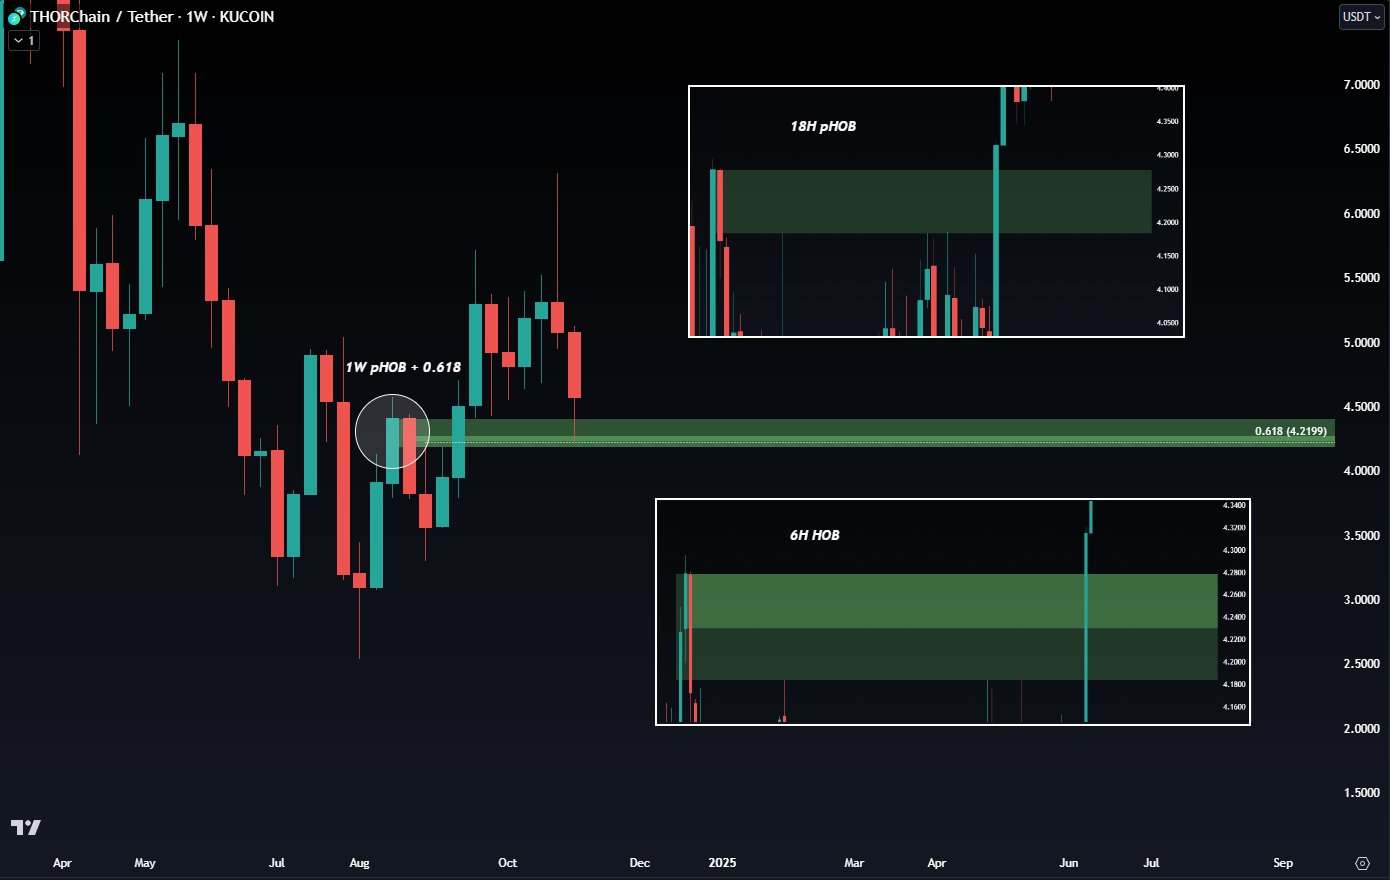
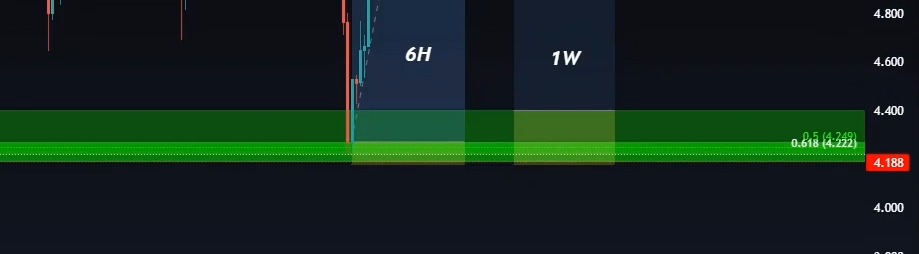
A 1W PHOB + 0.618 as the HTF area. Market structure is bullish — HHs and HLs.
Refining, multiple TFs show a PHOB inside the HTF area (18H is a clean one). On the MTF, a clean 6H HOB inside the 18H PHOB, near the untested 0.618 fib. That's the entry.
Break it down step by step. Start from the higher TFs and work down to MTFs/LTFs.
A note on confirmation: You don't want a candle close below the 0.5 of the refined BB area. If it does, you lose confirmation and the level shows weakness.
Why Refinement Is the Game-Changer
This is the skill. The single most important one.
Refining/ultra-refining your positions is what allows you to minimize 🔷Stop Losses, leading to excellent R:R. That's how you justify entering with 20X leverage (at least). On 3-5X, or pure spot, you're leaving most of the gain on the table even when right.
As a spot holder it still matters — you can buy local lows instead of DCA'ing all the way down, and sell tops instead of buying near them. But if you want the maximum leverage of being right, you need futures and you need refinement.
OP:
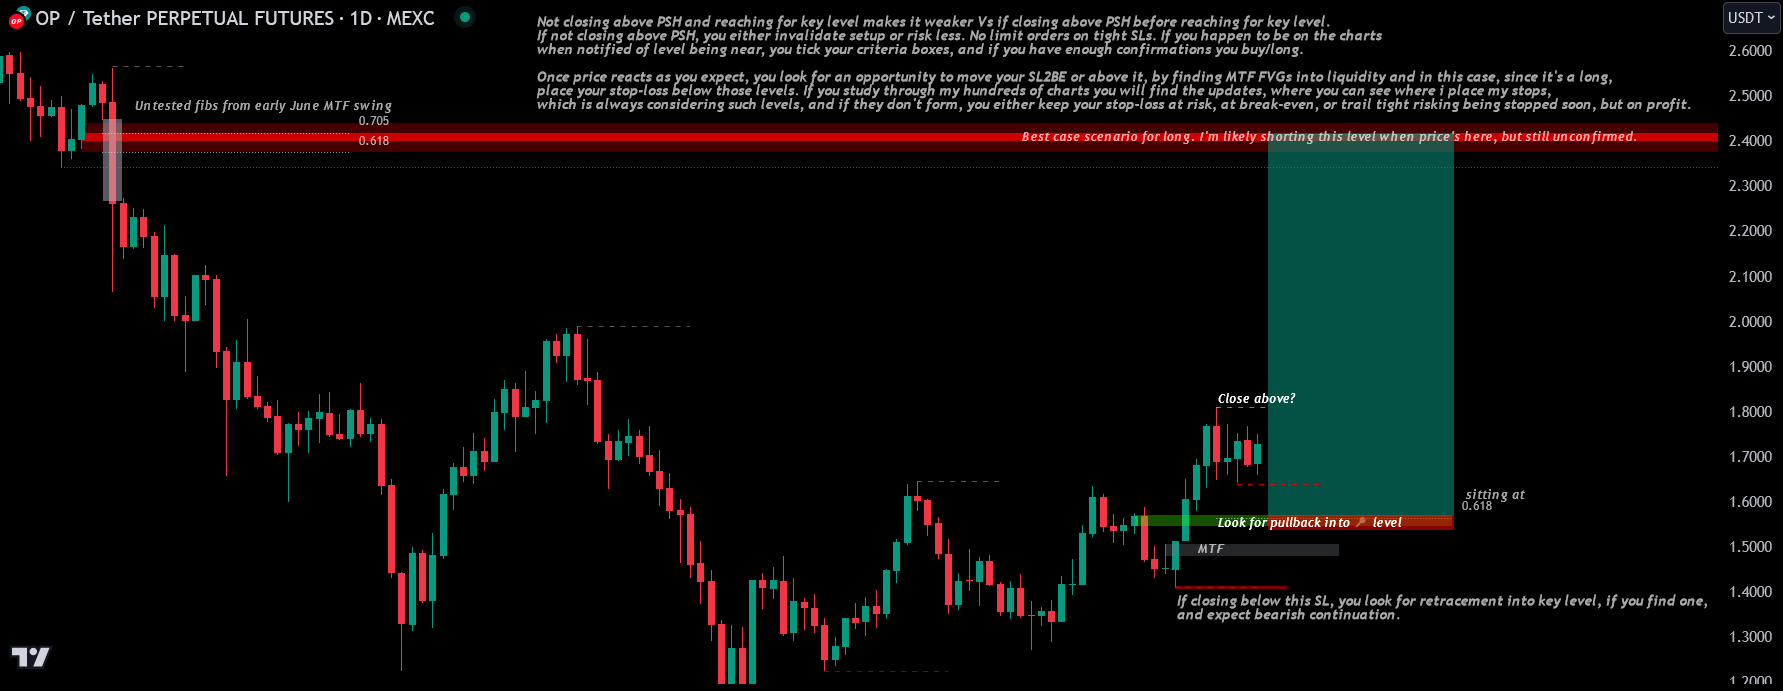
How do you distinguish which OB is most powerful when there are similar setups on 2D and 3D?
MS matters. The higher the timeframe, the more powerful. The more you can refine, the more powerful.
- A key level on Weekly that's also a key level on 5D, 3D, 2D, 8H — that's a strong level.
- A key level on 2W, W, 5D, 3D, 2D, 8H, where you can refine entry below 8H — semi-optimal, potentially Optimal Plays if it's BTC or a high-volume coin.
- A key level on a single TF (e.g. daily only) — don't ignore it, but don't expect it to be as powerful. 🔷Position Size accordingly. Not Optimal & Semi Optimal Plays
You don't have a big enough 📝Journal yet, nor enough data on your mind. You have to Play the Game🎮 for months to years and accumulate data. Only then do you find the patterns.
The more hidden, the more powerful — see 🎁Hidden Liquidity Levels. If a level is found only on MTF > LTFs, it's not as powerful as one confirmed HTF > MTF > LTFs.
👑Timeframe Rules is the broader lesson here: traders who claim they only look at 1 or 2 timeframes can never show consistent positive results.
On Stop Losses
You should never be entering on 5%+ stop losses, let alone 10%+. That's amateur and won't make you consistently profitable. 🔷Stop Loss
You should also never widen stops if price goes against you. That's how accounts blow up.
You should not go long because the news is bullish, or short because it's bearish. Whales don't telegraph their next move. Whales aren't your friends. They want you poor. Whale Manipulation🐋
You'll see a lot of plays out there on wide stops because the trader can't refine. Perfect entries on 1% SL are possible — proven on real plays. There's nothing stopping you from getting there.
More Worked Examples — Refining or Ultra-Refining
OCEAN 🎁:
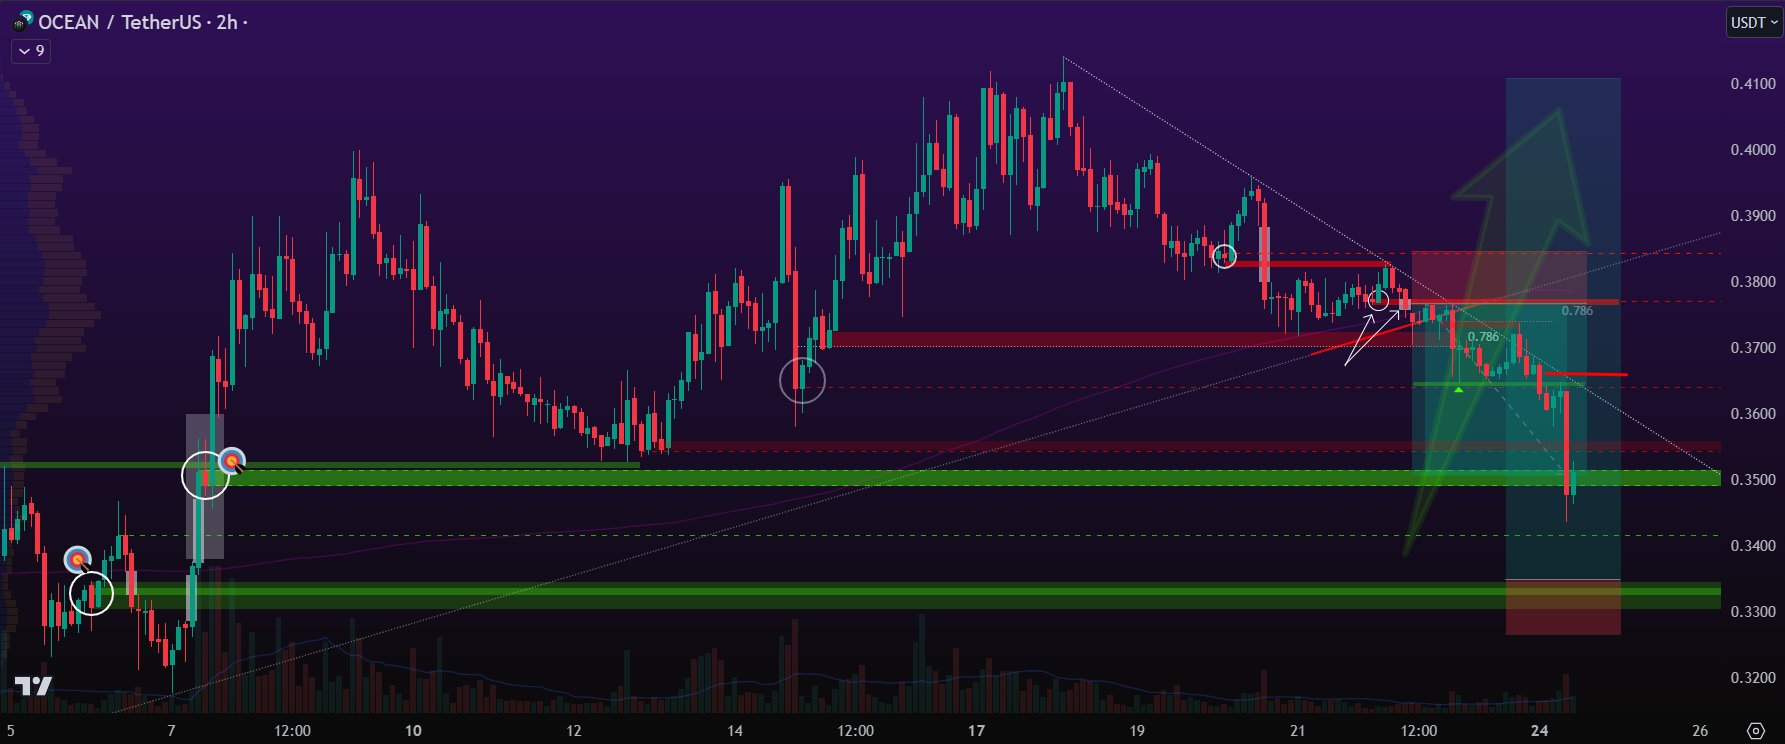
Refining to the freshest part of an OB (the lower level).
TRUMP — limited price action coin where you have to find the full chart:

The HTF demand from February '24 is the area to look for reversal. Inexperienced traders can't pinpoint when the reversal occurs even if they see the PA. You have to consider past liquidity levels that haven't been tapped — see 🎁Hidden Liquidity Levels.
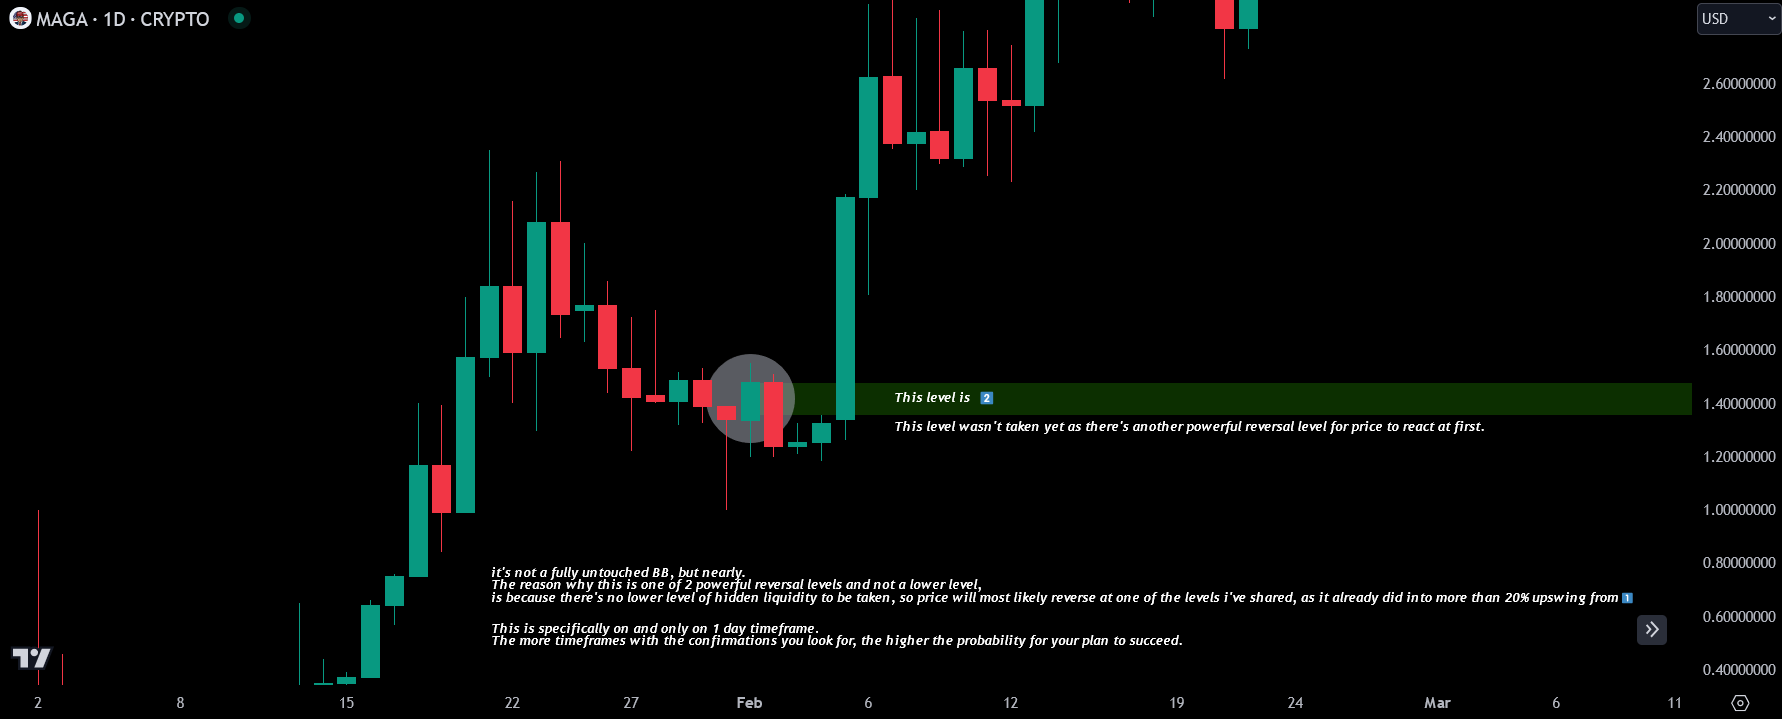
You don't have to FOMO in. With sound 👑Risk Management, you can. The level offered ~7% SL on the daily — apply the same to a spot position. If wrong, lose 7% and move on. There's no point holding a losing trade hoping for reversal — that's being exit liquidity. It's a 24/7 market with thousands of coins.
This play can be refined on lower timeframes — tightening the level, significantly improving 🔷Risk Reward. Refining is the true game-changer. Look around CX — almost no one refines into a min average 5R or 6R, let alone 10R or 30R+.
A perfect entry where the average trader has no idea why it just reversed off a powerful double-bottom. You take the money and leave — see Reversal.
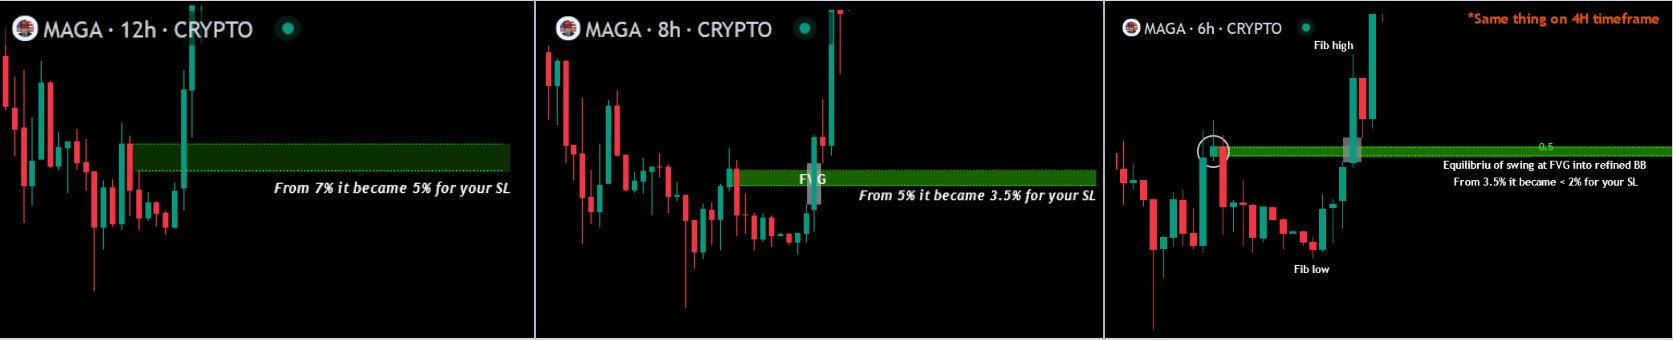
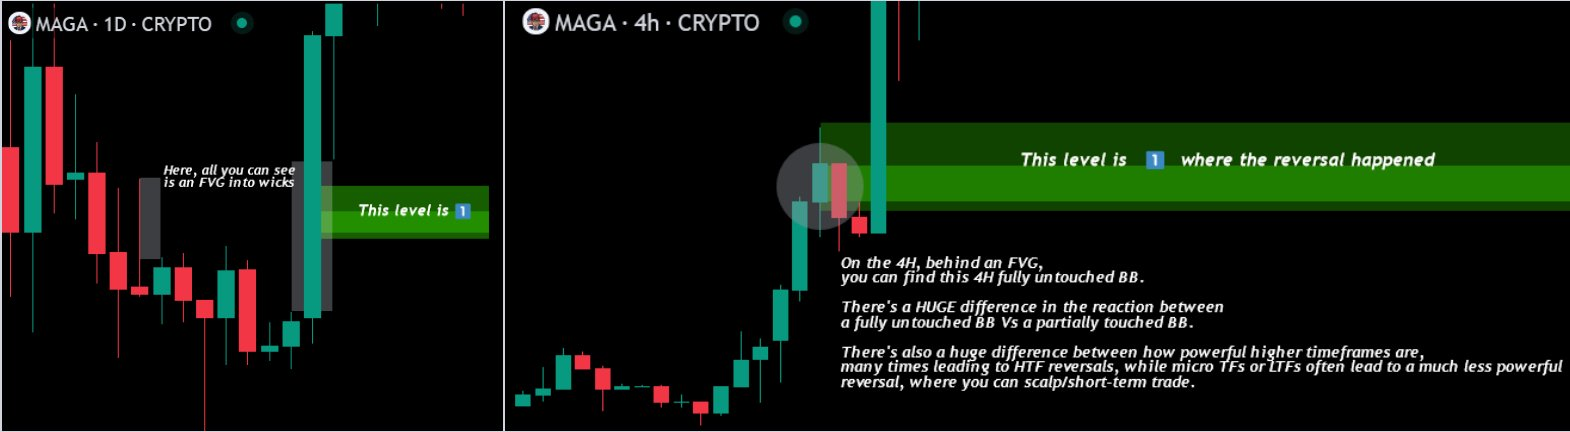
A common question on this kind of chart:
Where's the larger green box that encompasses the 4h BB for reversal level 1?
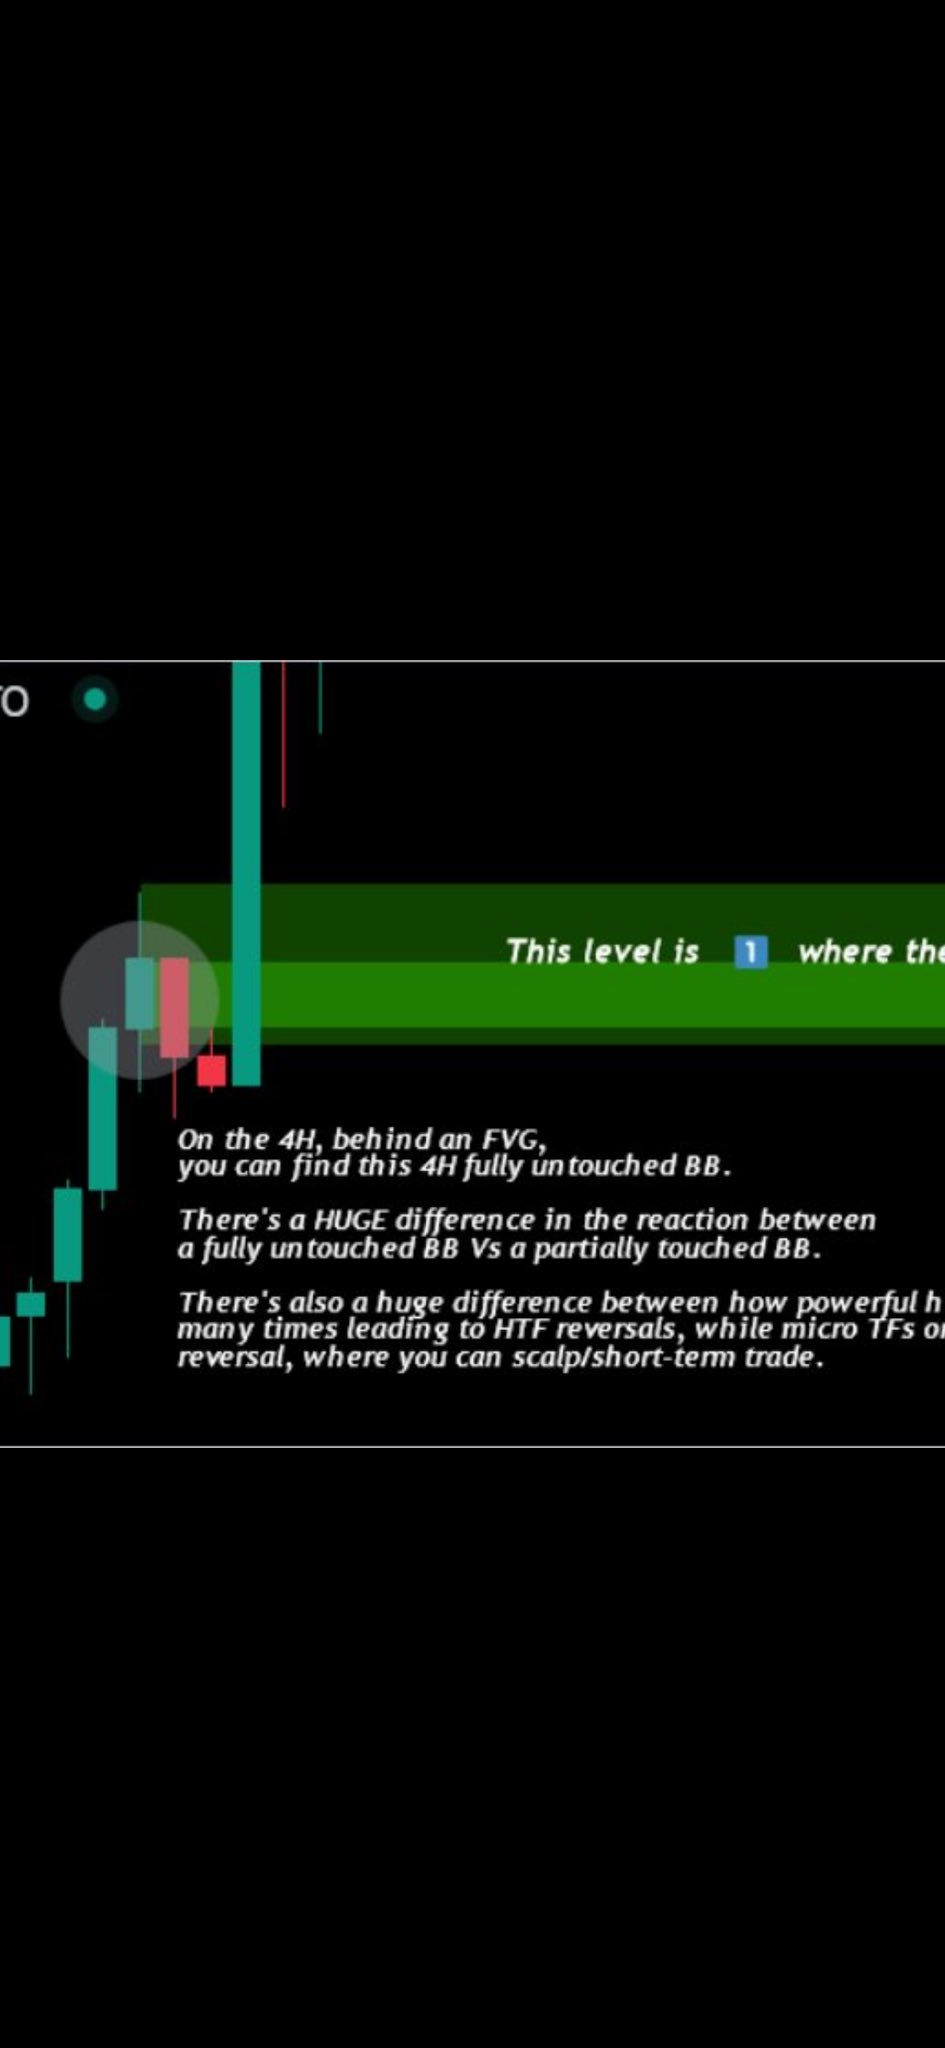
Answer: 5D.
CYBER:

Learn to refine/ultra-refine into untapped liquidity and you beat the game.
BNT:
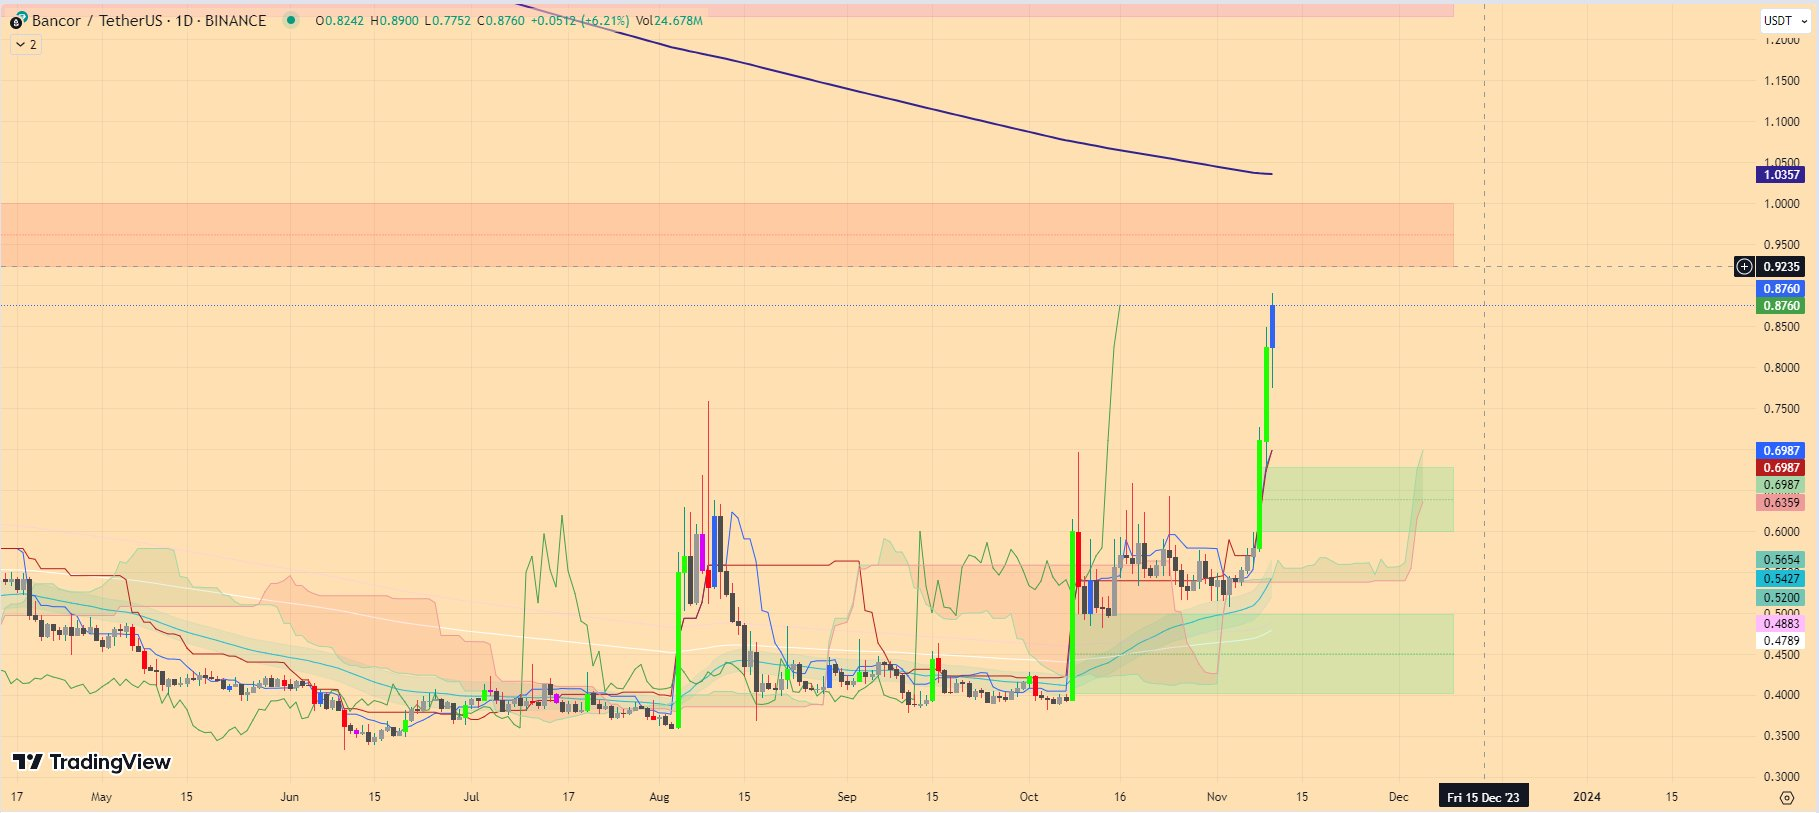
You might think this is the closest HTF ♨️ level between $0.92 and $1.04. Good try — not good enough. Refine for best R:R. That range is too wide despite being where the refined level lives.
ADA:
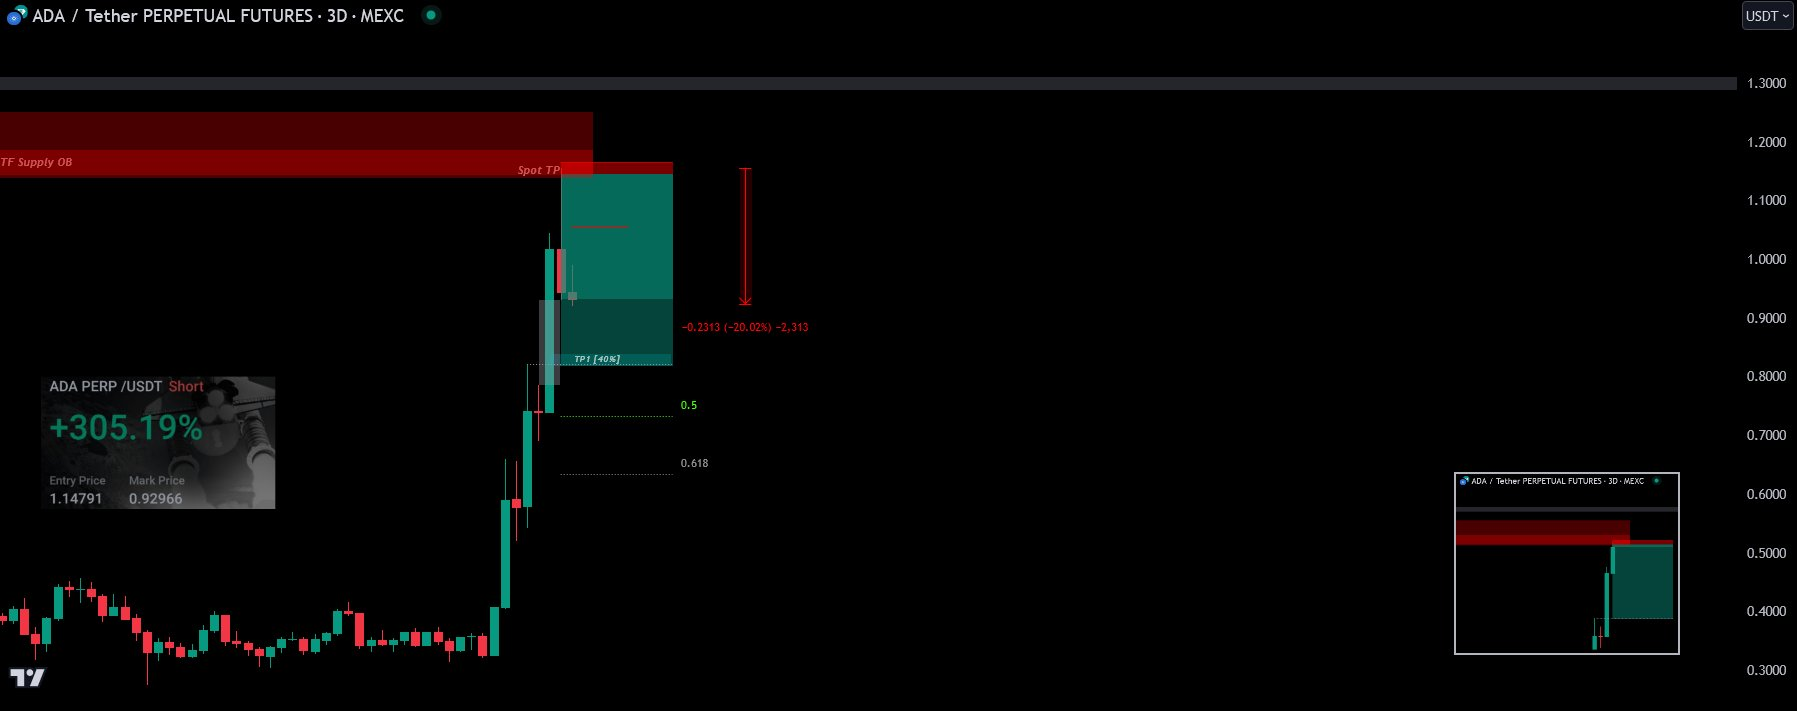
Why choose the 5D/3D OB and ignore the massive Monthly OB outside the supply area?
Supply and demand principles, refined into bodies instead of wicks — see 🎁Supply & Demand.
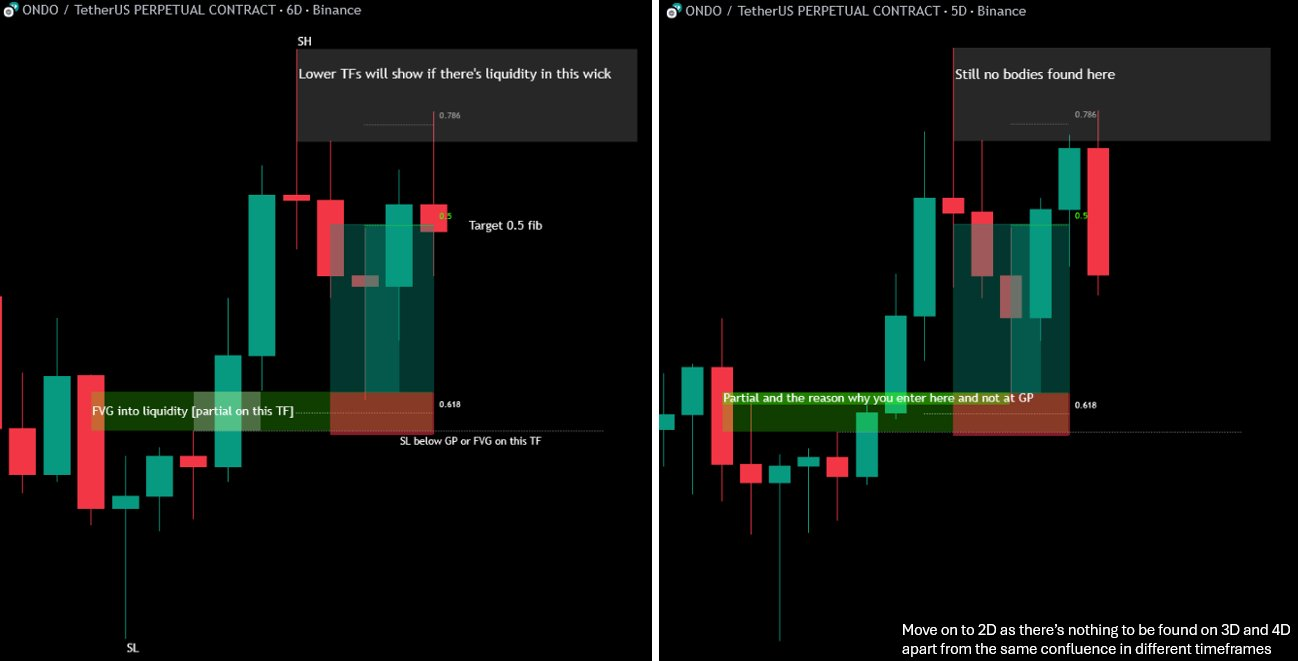
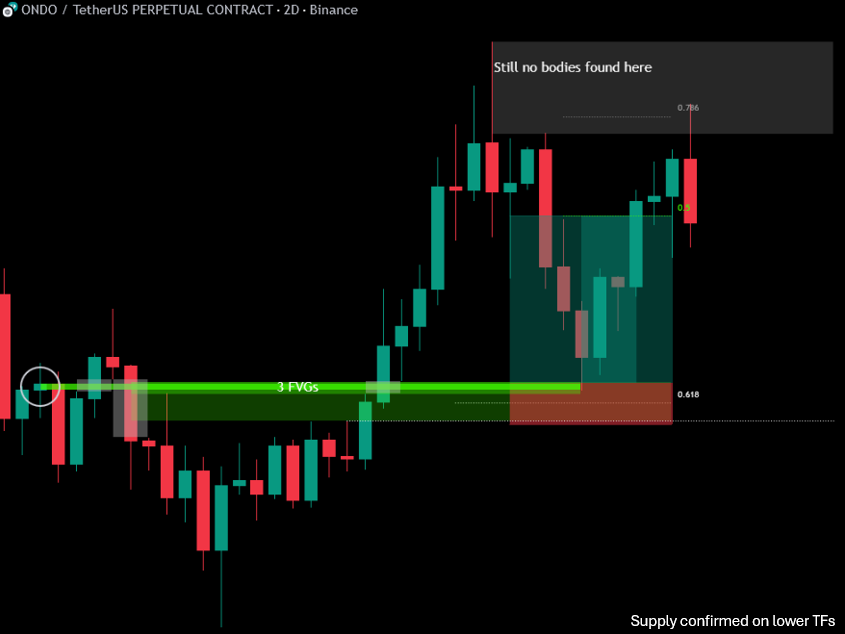
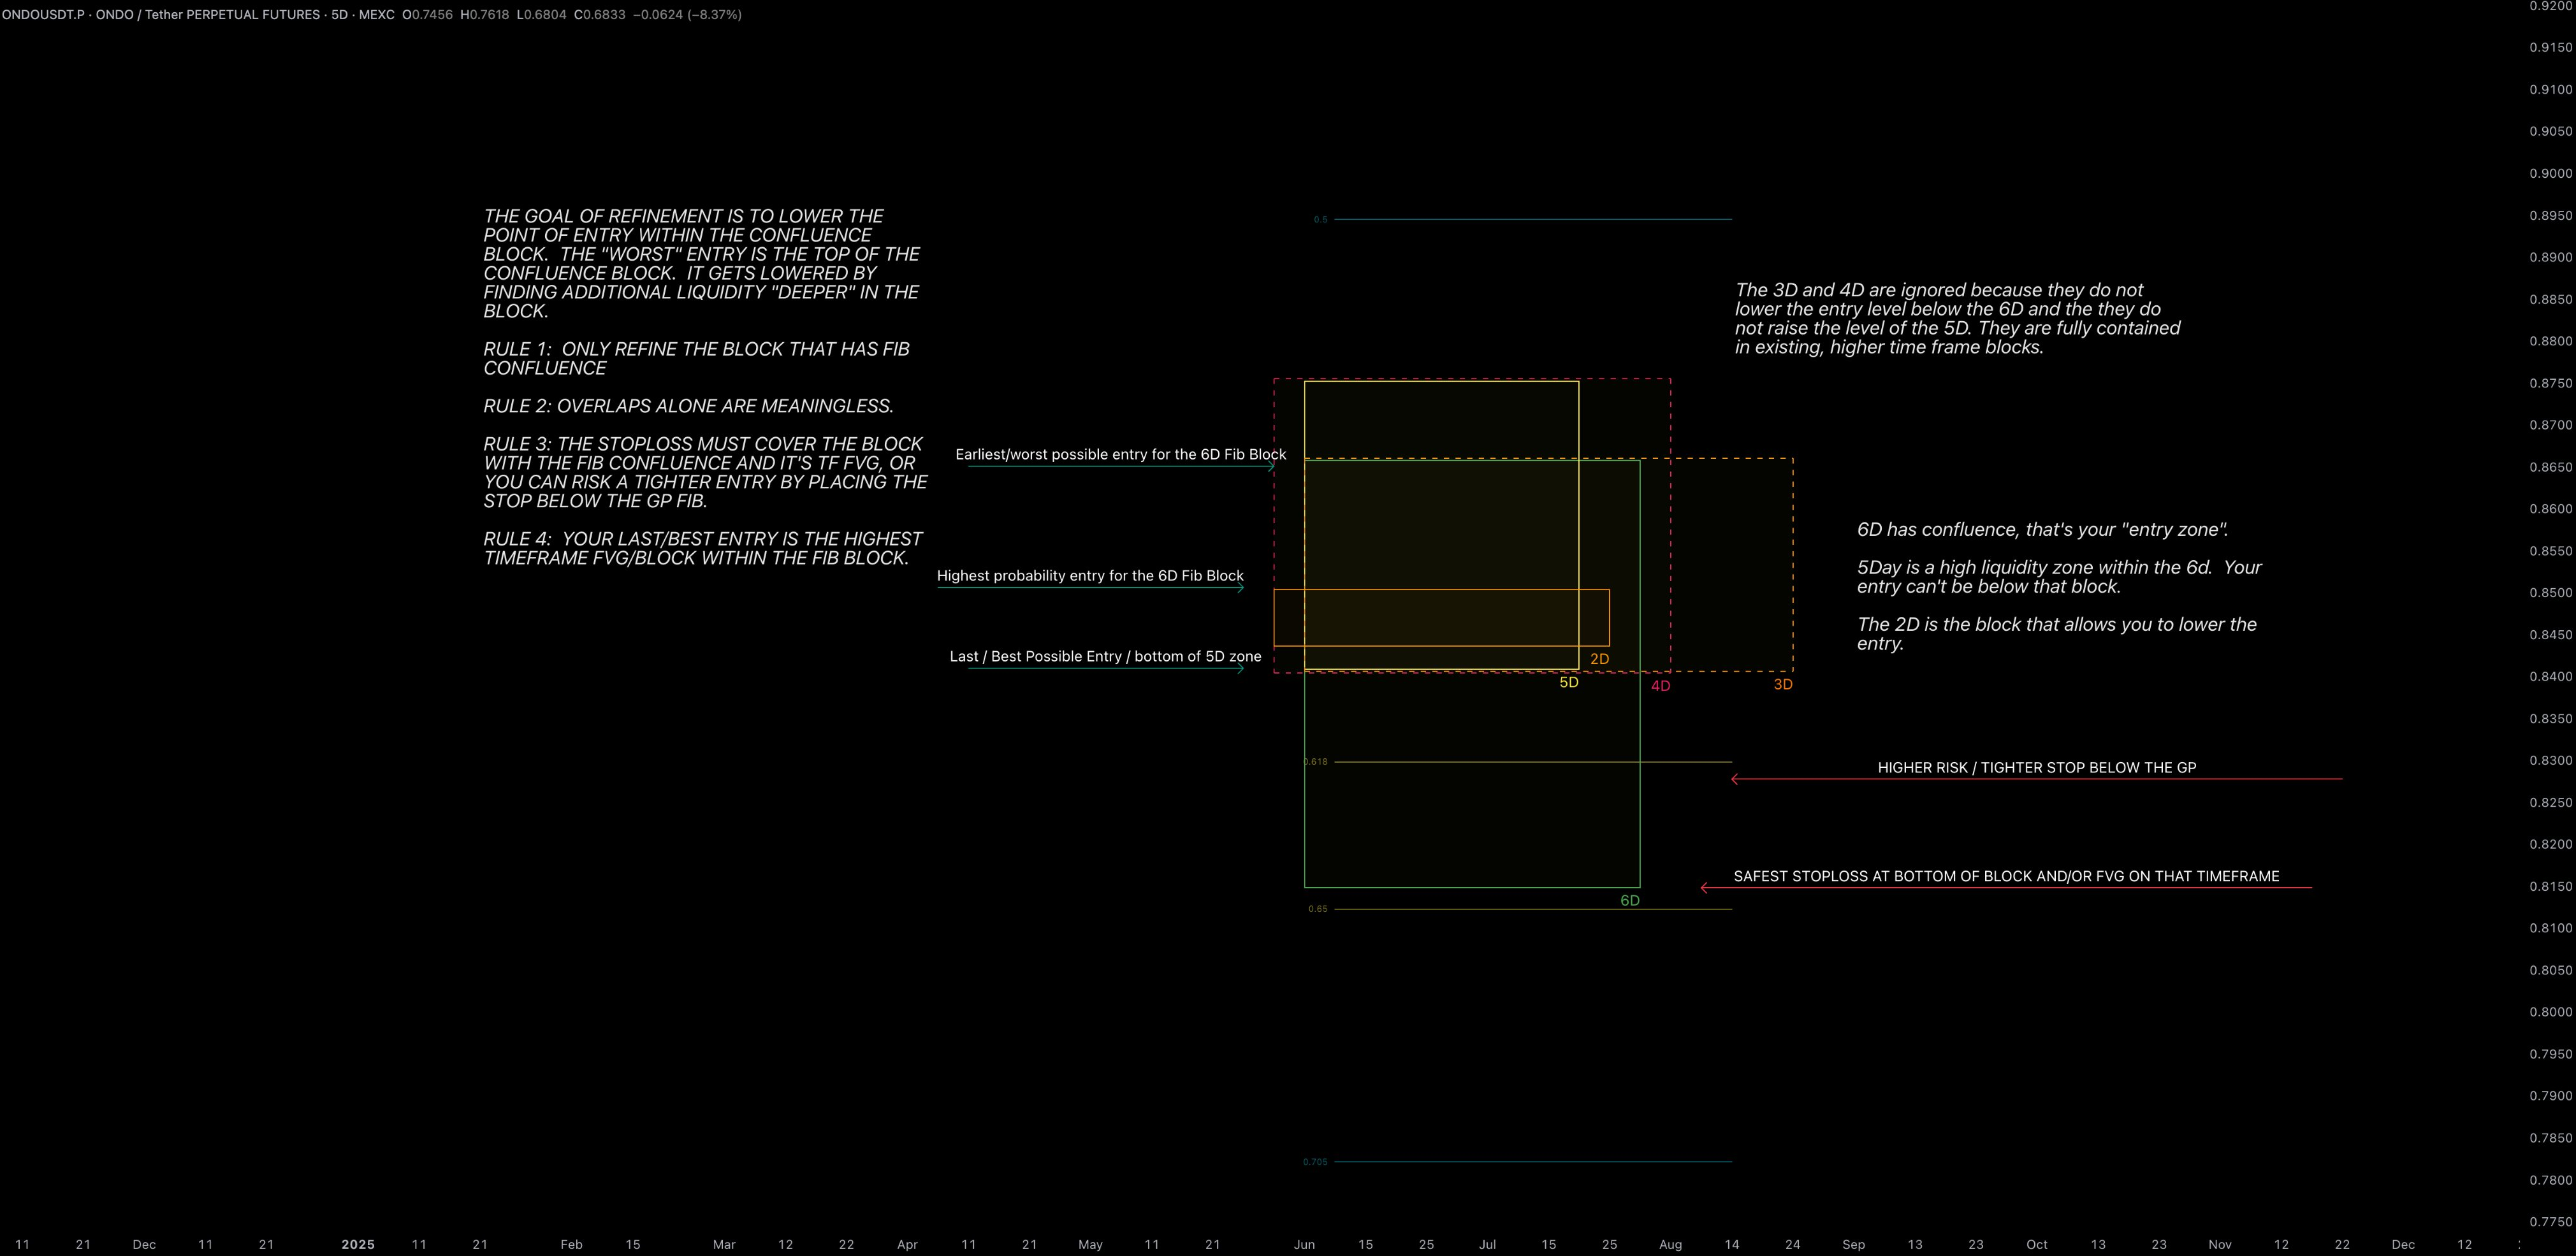
A Masterclass in Refinement — ONDO
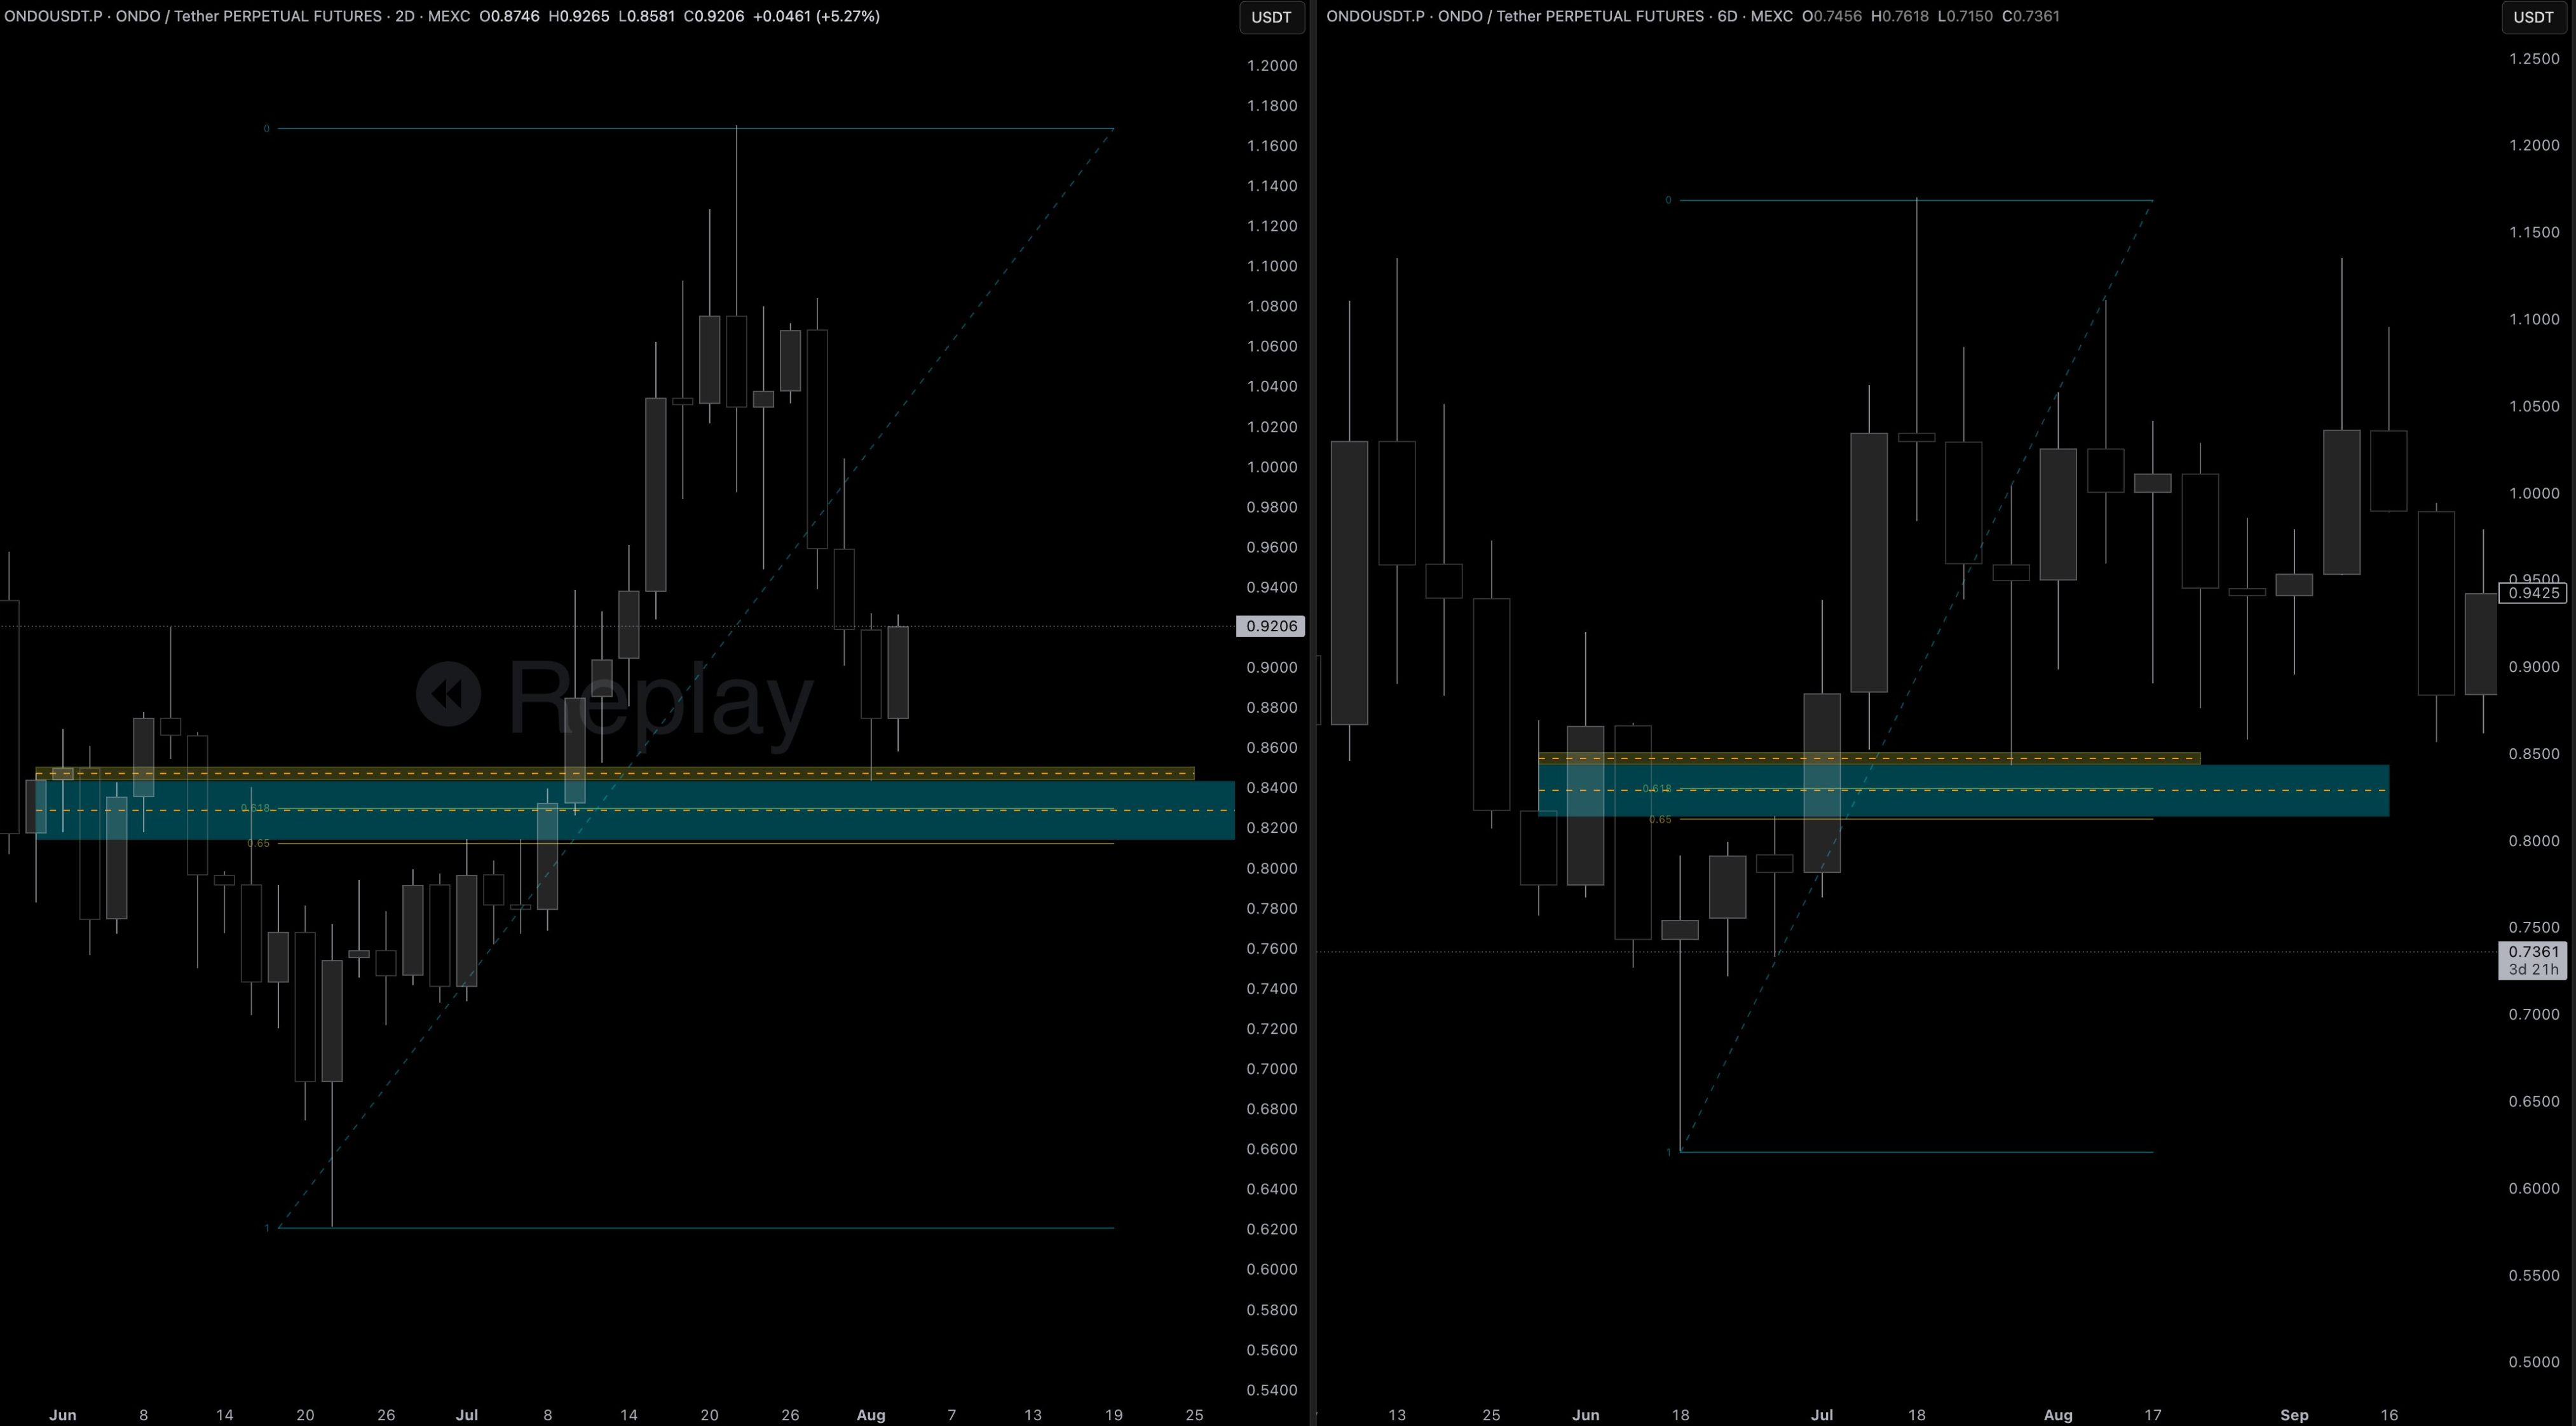
Sometimes a 2D level on its own has no fib confluence. But the 2D level can be a refinement of a 6D HOB. The level being taken is the higher timeframe (6D), which does have 0.618 fib confluence. The algo will take the 6D block — but the 6D is very large. Which part of it gets taken? The 2D, sitting inside the 6D.
So the entry is the 2D. You can have a target level that's not perfectly aligned to the swing — the confluence is on another level/timeframe. You have to see the bigger picture.
There was also a 7D block above the 2D, but it had no fib confluence and wasn't deep enough into the retracement.
MOODENG — Refining a 2W 🗝️

A Favorite Setup
Another BAKE
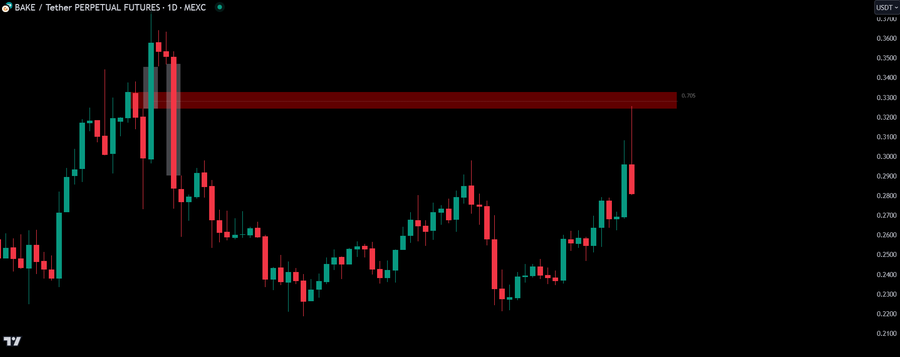
Same answer as before: didn't need to refine further. The reversal level was clear. I refine when it makes sense and when I'm able to through lower TFs. Play the Game🎮
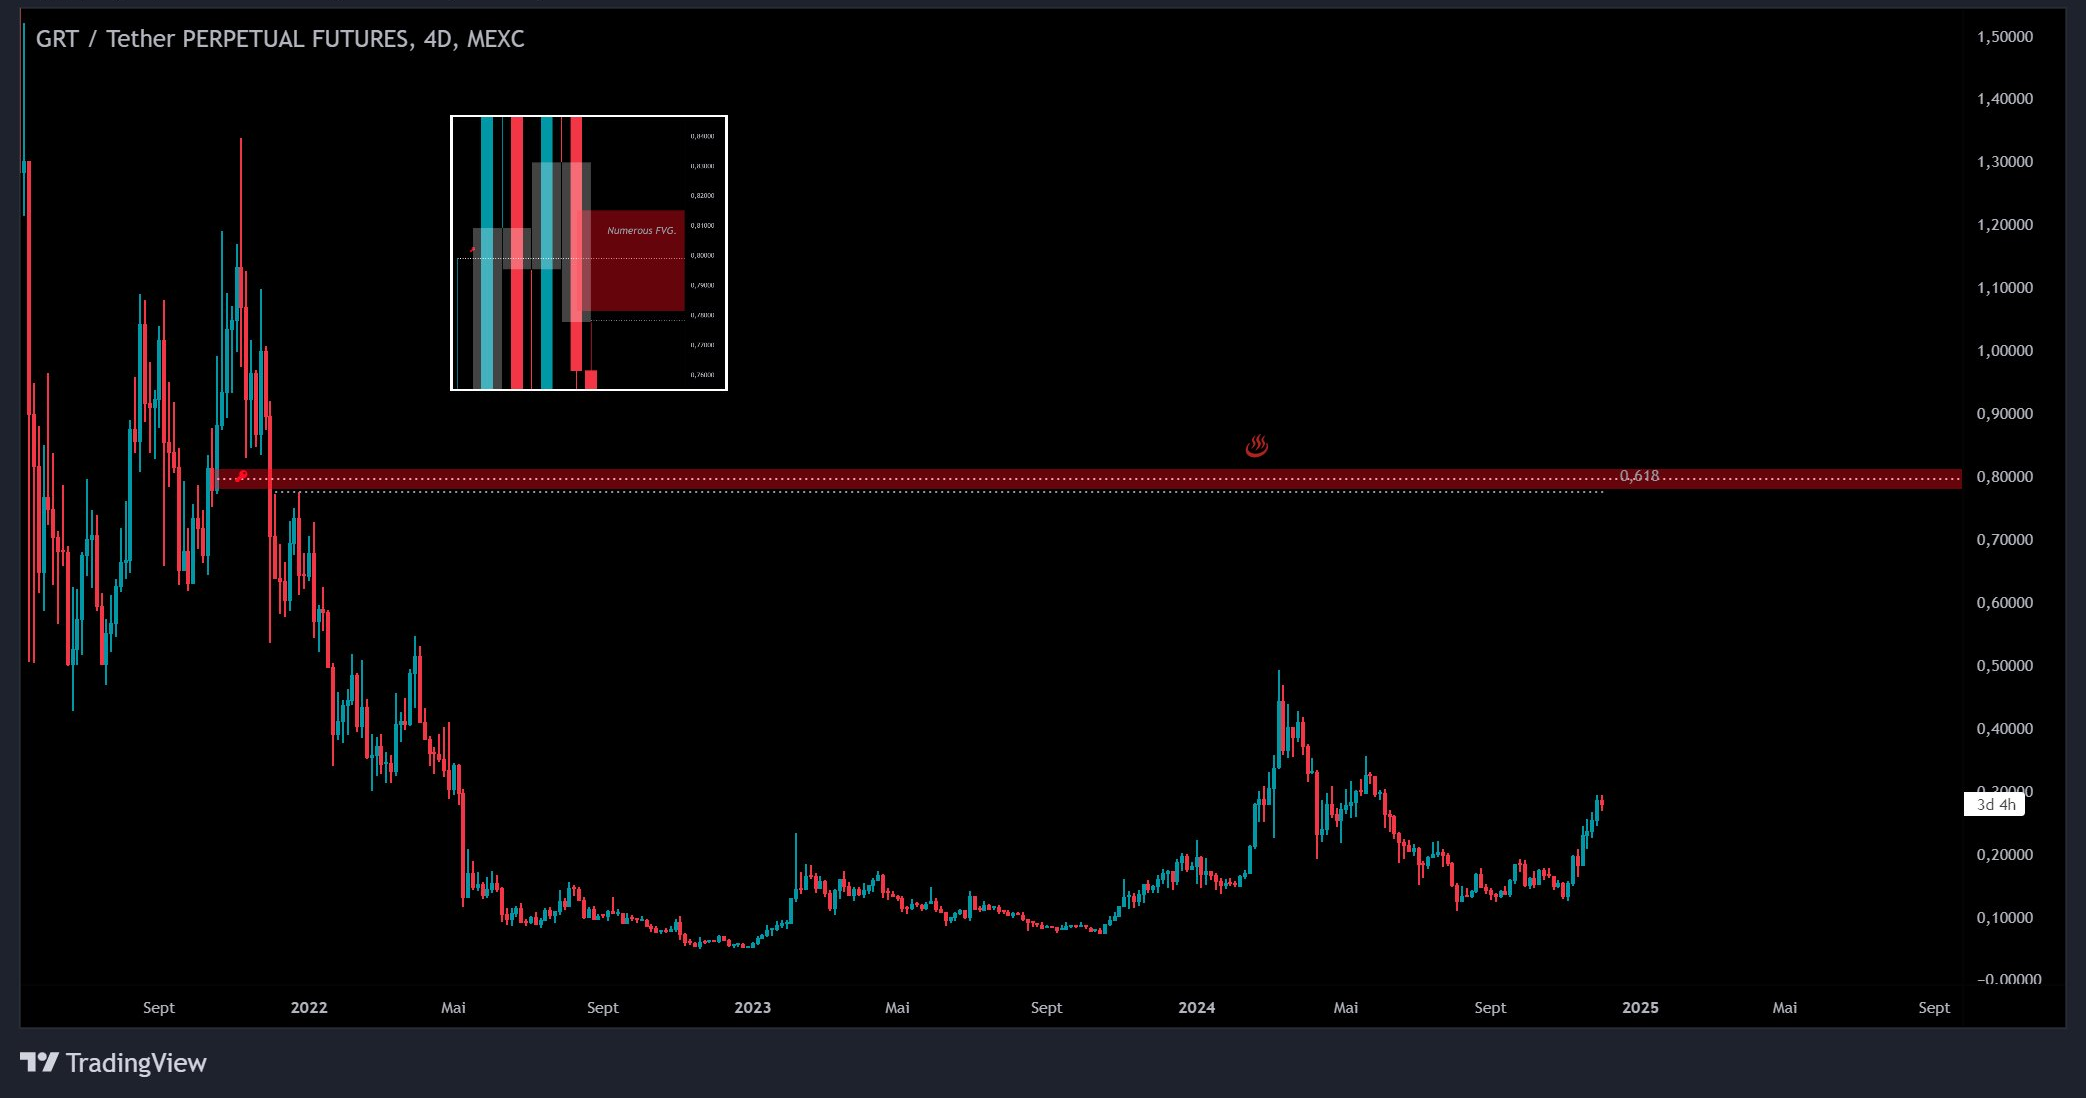
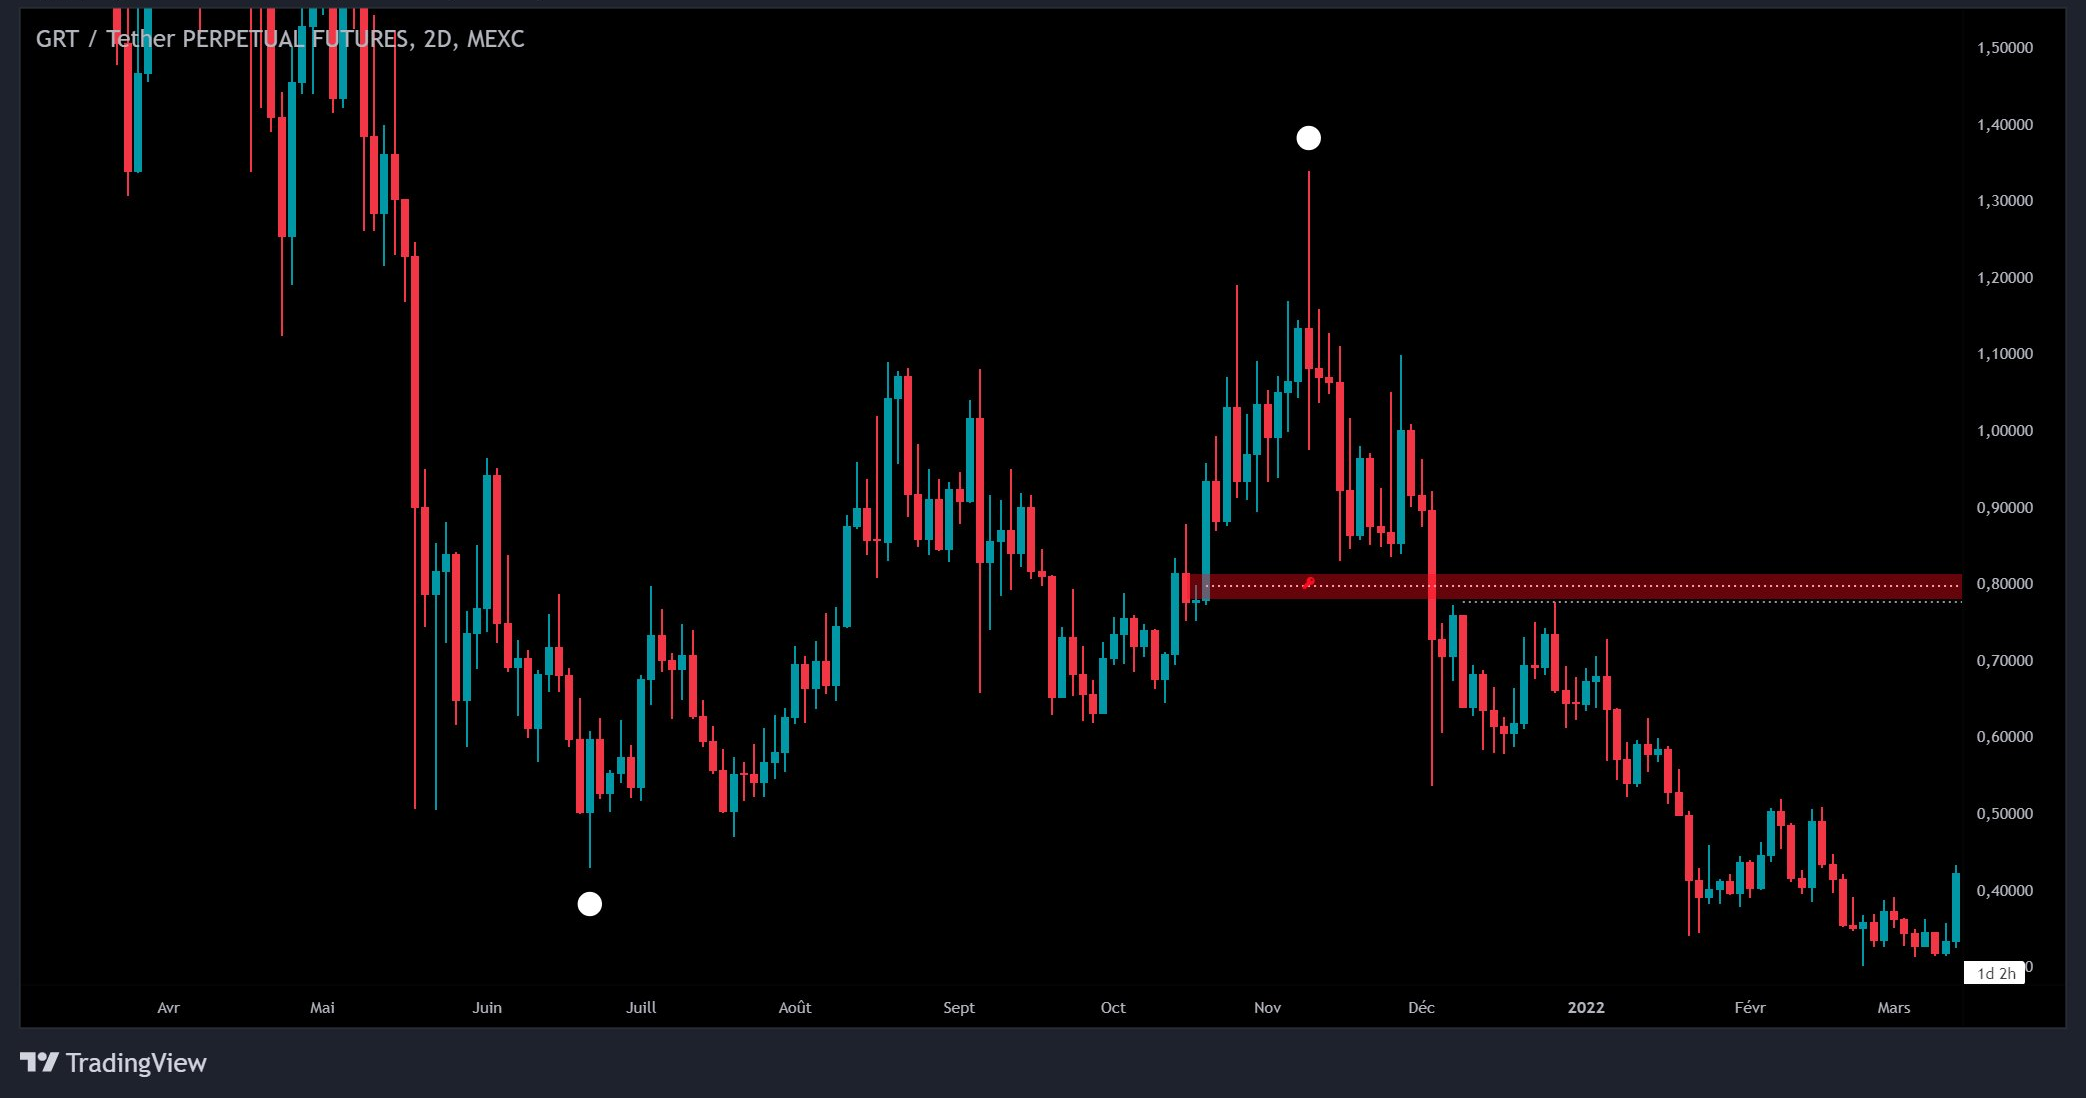
A Worked Example to Try Yourself
A practice setup on GRT, 4D 19D ♨️🔑 — once you've found the zone, refine it as much as possible between 1M and 4D.
A different chart with hints:
Do you consider this type of structure to be a partial HOB and therefore added confluence?
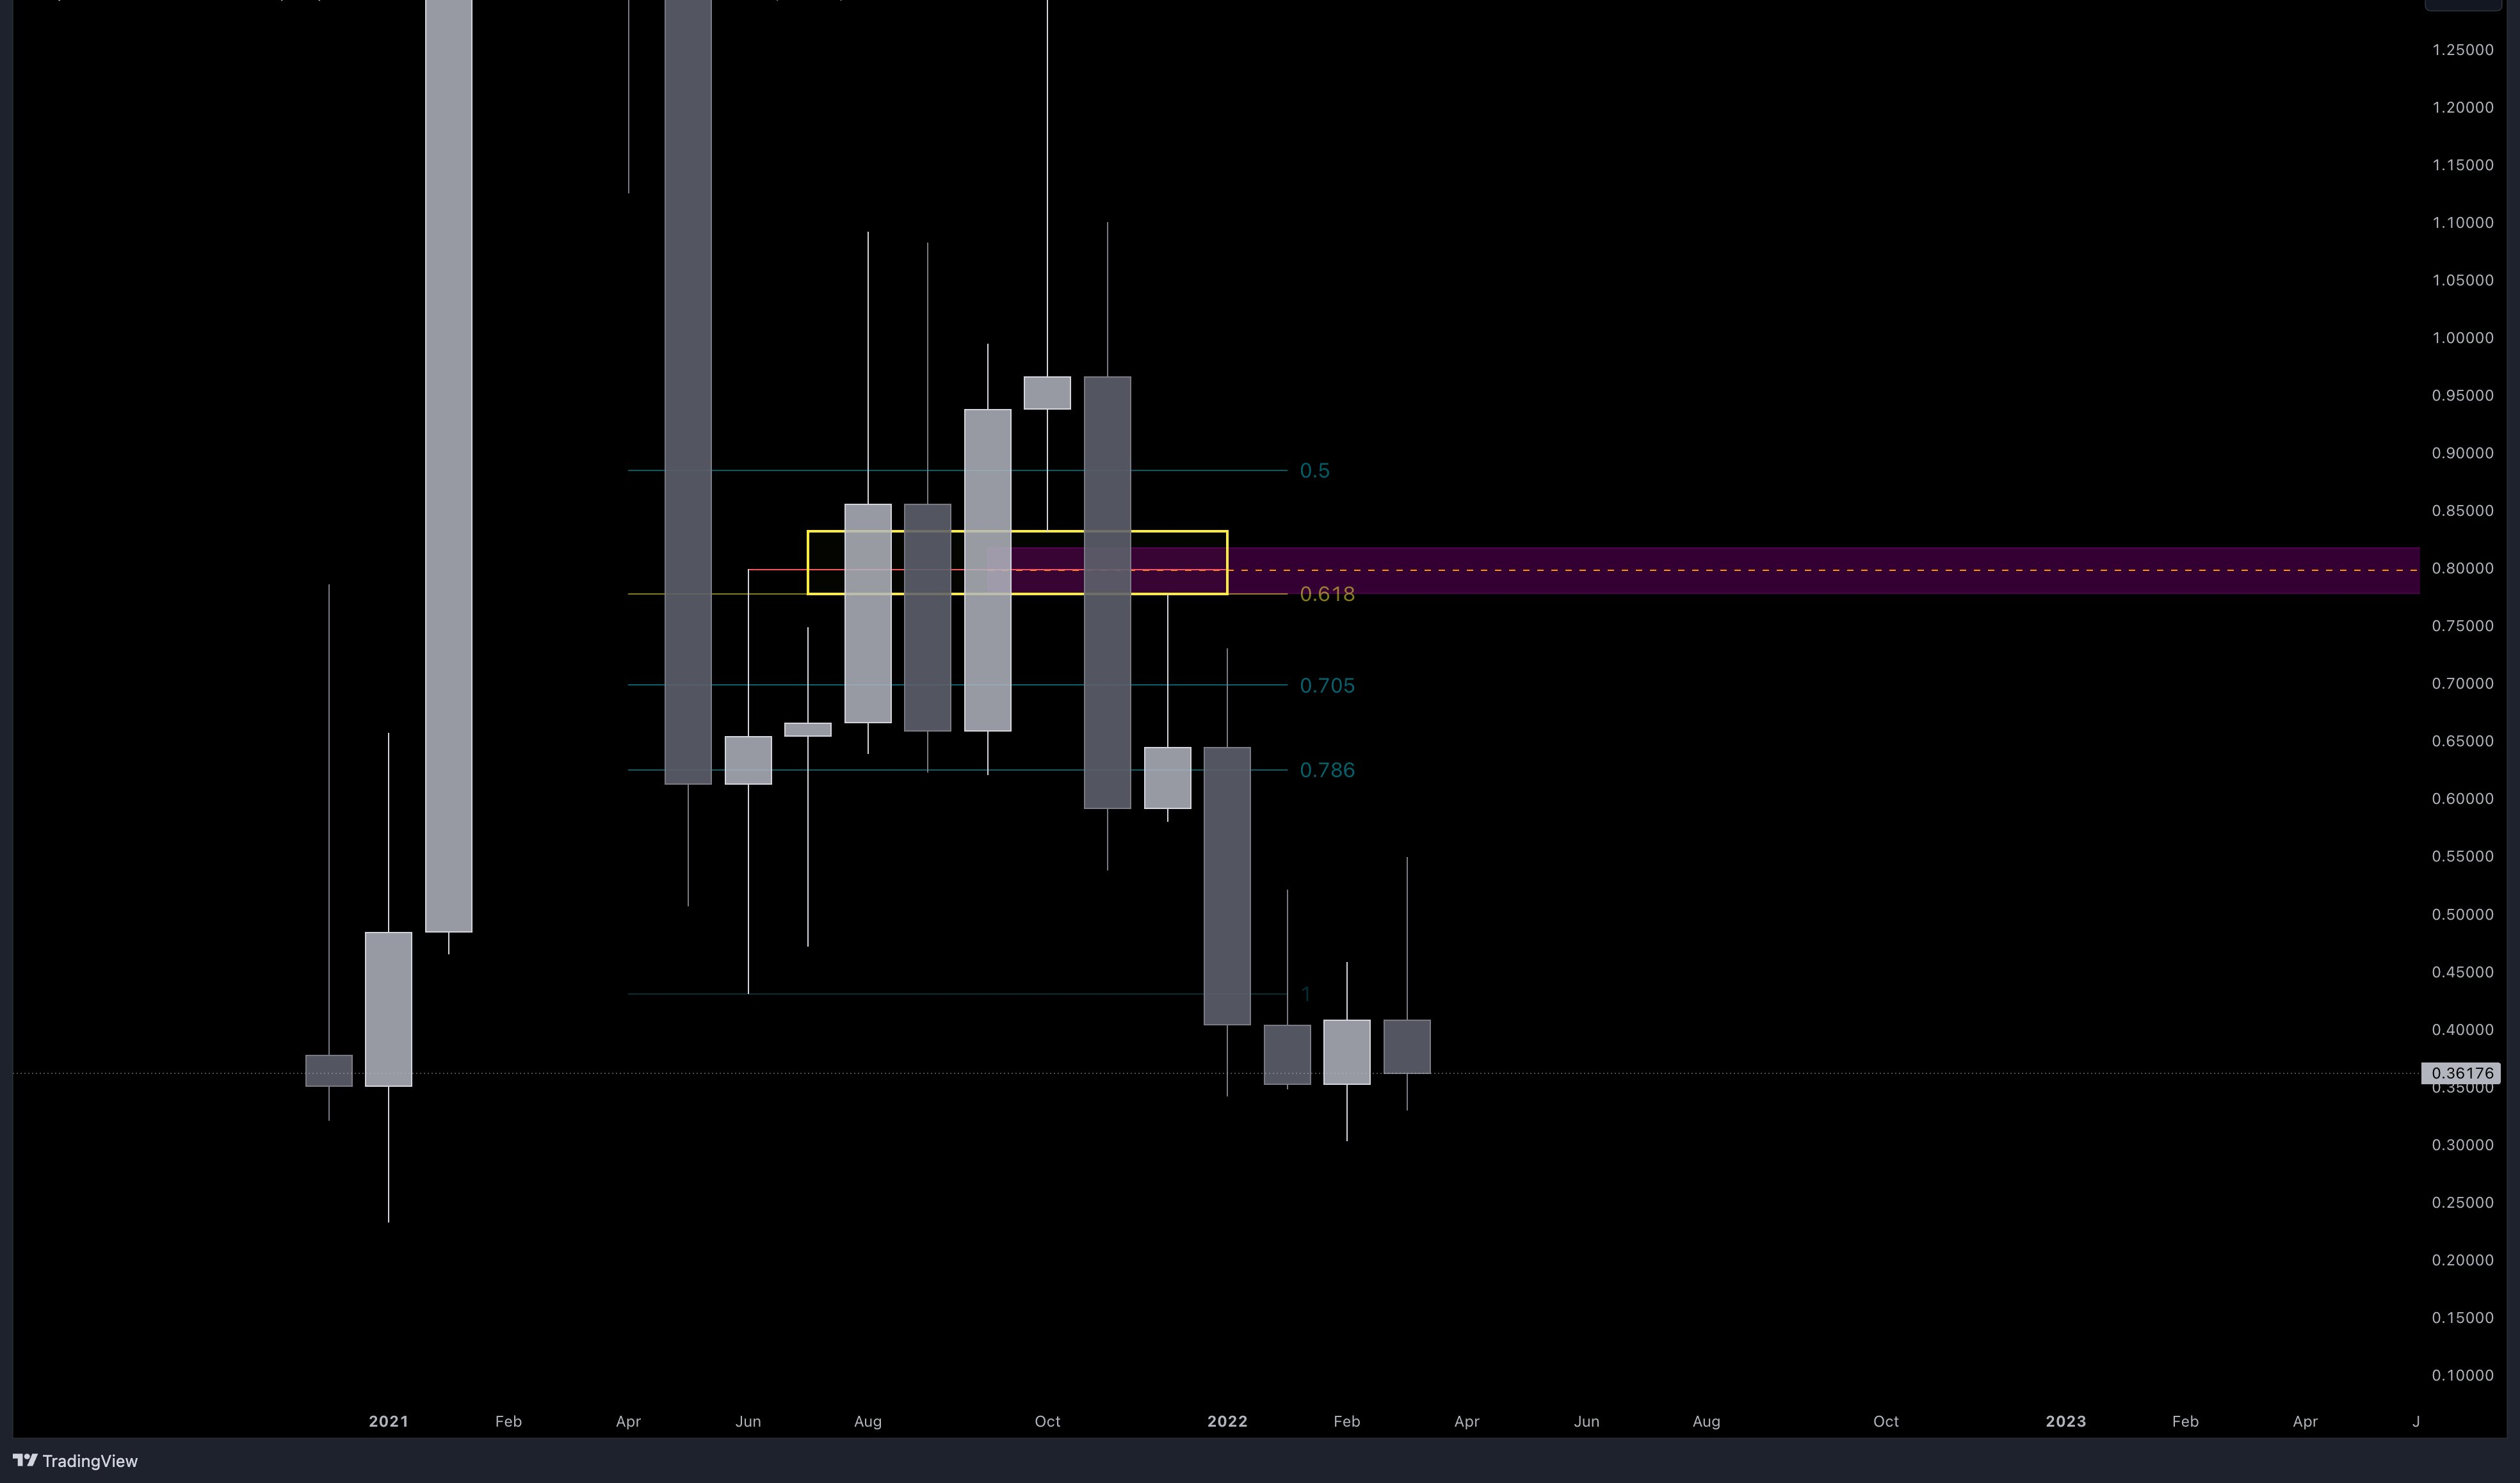
Yes. Passing through an FVG, the OB becomes a BB. Indeed it's partial because a portion has already been covered. See Refining Example and Trading is a Masterpiece for more.
Final Thoughts
Refining isn't a checklist — it's a judgment. The rules and frameworks above (use S/D only when no HTF BBs exist, refine into FWs, work HTF → MTF → LTF, stop when the reversal is clear, watch for front-running) get you 90% of the way. The last 10% is reps. Play the Game🎮 for months and years, log everything in a 📝Journal, and the patterns reveal themselves.
You don't need to be right 100% of the time. You need to put in the time. Even a 30% hit rate with ruthless 👑Risk Management and proper refinement makes millionaires — because 1 HTF winner + 5 LTF losing trades can still end in profit. It's basic math on size and risk.
Master refining. That's the move.